[ASP.NET MVC][Vue3] 藍新金流 NewebPay API 串接教學
藍新金流 NewebPay 是國內第三方支付平台之一,金流界俗稱的紅藍綠之中的藍新金流。
第三方支付平台提供代收款及代付款等功能,幫助電商網站在網路上向消費者收款,而第三方支付平台則收取手續費做為營業收入。
藍新金流提供主流收款方式,包含線上刷卡、超商代收、ATM/WebATM 以及行動支付工具,每種收款方式的手續費各有不同,關於費率表可參考官方說明。
今天將會示範如何在 ASP.NET 串接藍新金流 API,執行線上交易,藍新金流提供測試環境幫助初次串接者測試,所以我會以測試環境做為示範。
Contents
藍新金流 API 文件
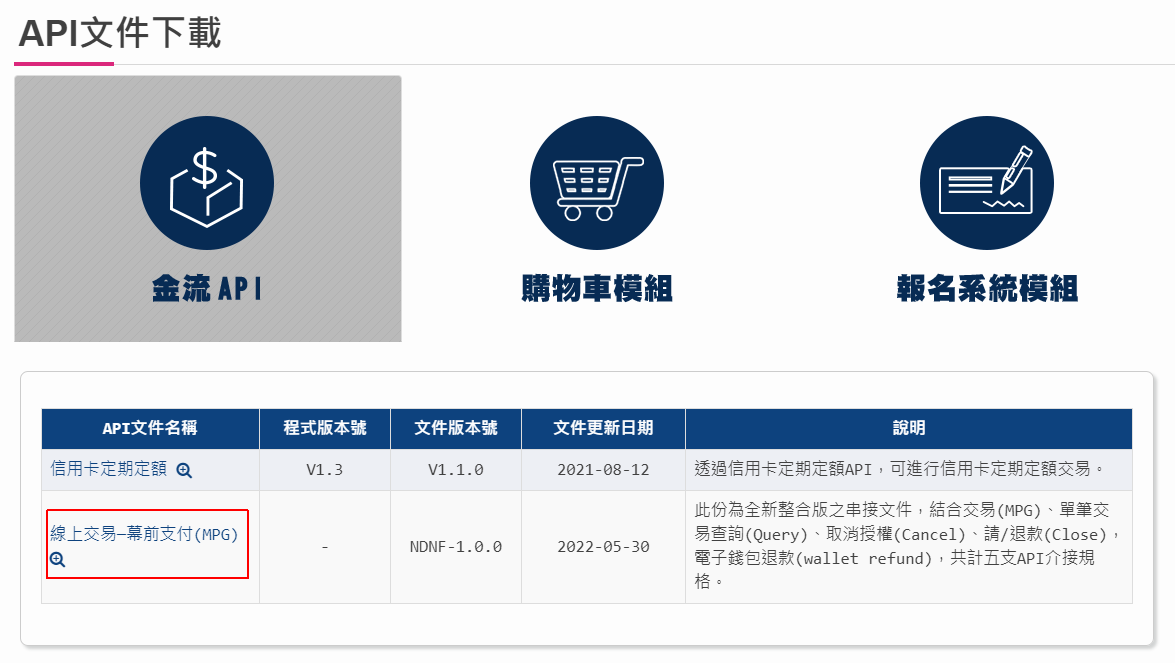
串接 API 的規則都寫在文件內,可以到 API 文件下載區點擊「線上交易─幕前支付(MPG)」下載。
要串接的重要資訊都寫在此文件內,串接前一定要看一下。
API 版本會隨時間更新,如果有以前建置的 API,也要定期看一下是否要更新程式內的 API 規則。
串接 API 前準備事項
藍新金流測試環境
對於第一次串接的人來說,難免會有一些狀況發生,而且金流又有錢的問題,如果出錯導致虧損就不好了,建議先在測試環境下串接成功了,再移到正式環境再測一遍。
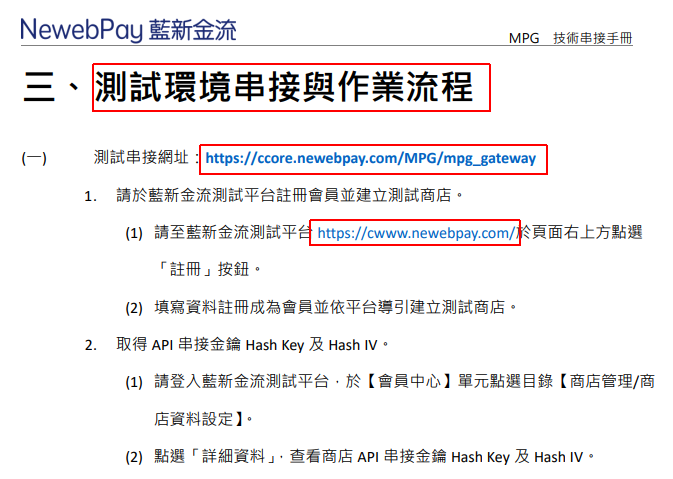
在 API 文件內有測試環境串接說明。
有 2 個測試網址,串接網址: https://ccore.newebpay.com/MPG/mpg_gateway,後台管理網址: https://cwww.newebpay.com/,這兩個網址比較重要。
可以先到後台管理網址,註冊帳號填寫個人基本資料,首次註冊需要上傳一些證件驗證,要等官方審核後,才可開立商店。
如果太久都沒有審核通過,建議直接請客服幫忙比較快,因為是測試環境,審核不一定有人處理。
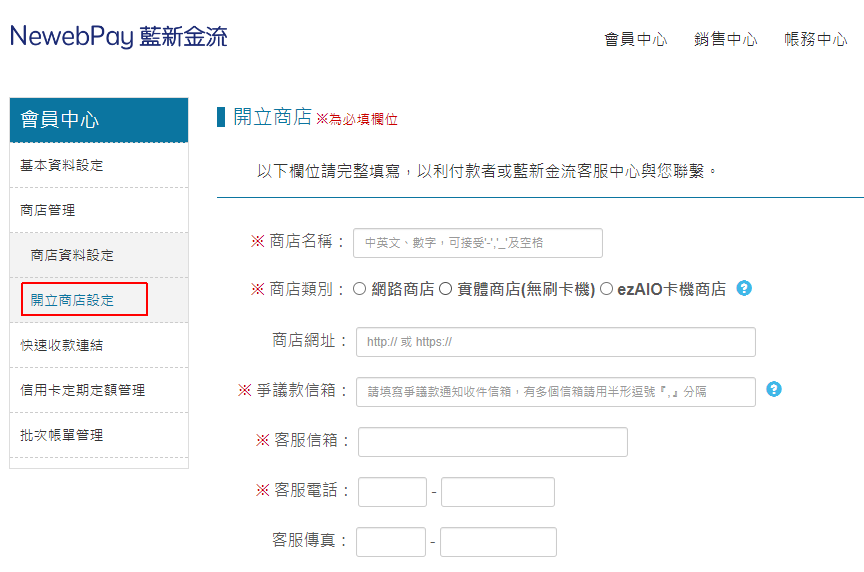
當審核通過後,就可以到「商店管理」的「開立商店設定」新增資料。
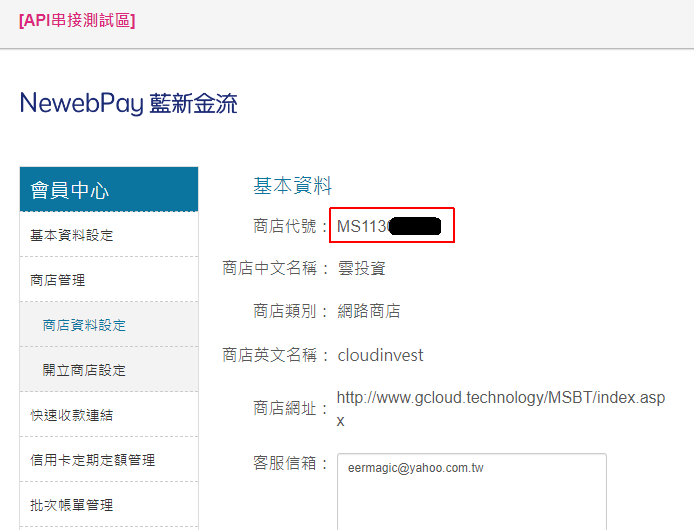
當開立商店完成後,點擊商店的「詳細資料」。
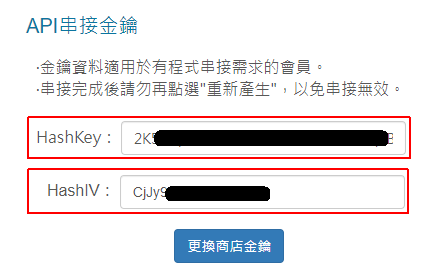
對 API 會用到的資訊有「商店代號」,以及下面的「API 串接金鑰」。
在下方會找到 API 串接金鑰。
對外網域
在呼叫金流 API 時,不管成功能否,都會由 API 伺服器主動回報執行結果,所以我們需要建立對外網域來接收結果,對外網域建議先有固定 IP 後,再由網域商註冊網域,然後透過 DNS 指向至網站主機。
如果需要註冊網域,可參考另一篇文章: GoDaddy 購買網域教學-建立你的網路門牌
在開發階段使用的 localhost 網址是不能測試金流 API 的喔。
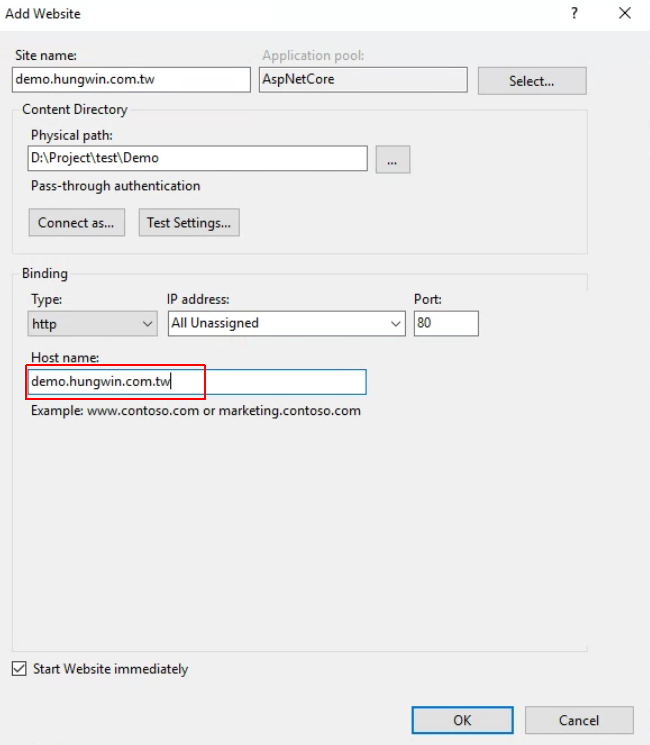
當開發好程式後,可以在對外網域的 IIS 上建立站台,指定接受網域。
建立專案
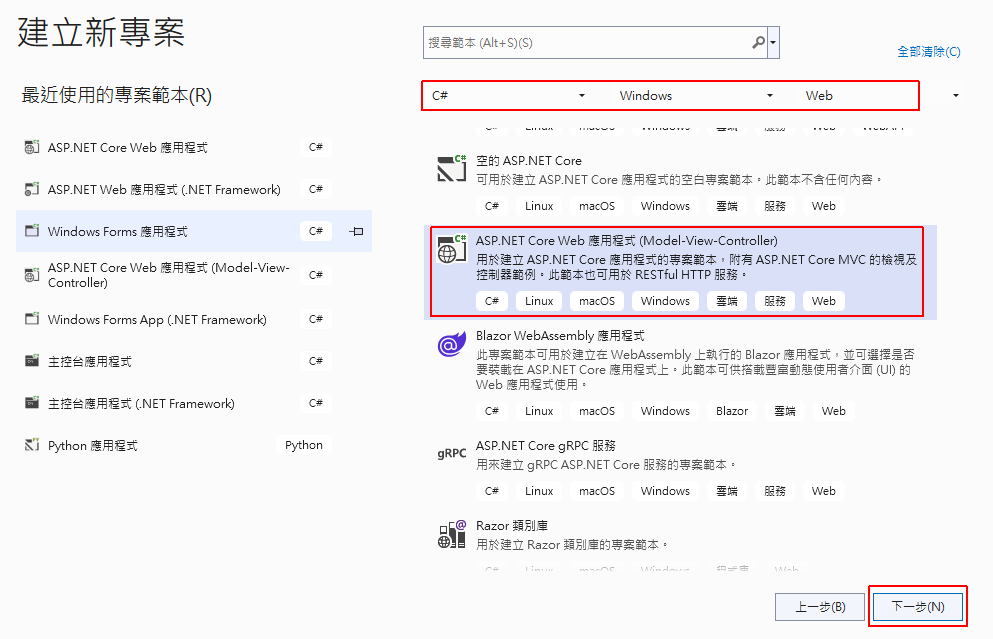
開啟 Visual Studio 2022,建立新專案為「ASP.NET Core Web 應用程式 (Model-View-Controller)」。
輸入專案名稱、路徑,架構選擇「.NET 6.0」版本,按下「建立」就會建立此專案。
加入 Vue3 套件
Vue3 是前端控制欄位的框架類別庫,打開 \Views\Shared\_Layout.cshtml 檔案,在下方 JavaScript 引用增加 Vue3 類別庫語法,順序的要求要放在 jQuery 之後才行。
<script src="https://unpkg.com/vue@3"></script>
當在 Layout 加上 Vue3 引用後,我們就可以在所有的頁面使用 Vue3 語法了,此引用語法來源可參考官方文件。
停用 Json 回傳預設小寫 (駝峰式命名) 設定
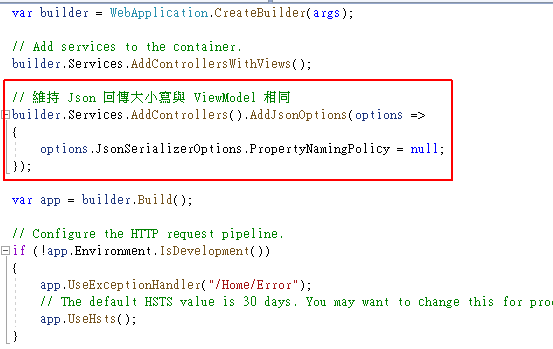
.NET Core 在 Controller 回傳 Json 時,會將變數修改為開頭預設小寫 (駝峰式命名),這設定容易造成前端取值大小寫問題,所以我會停用此設定。
在 Program.cs 加入以下語法:
|
1 2 3 4 5 |
// 維持 Json 回傳大小寫與 ViewModel 相同 builder.Services.AddControllers().AddJsonOptions(options => { options.JsonSerializerOptions.PropertyNamingPolicy = null; }); |
藍新金流 API 串接
接著我在 MVC 的主頁面 Home/Index 設計範例,因為 MVC 是分層架構,所以寫程式碼的位置也會跳來跳去的。我會依順序在不同頁面慢慢增加程式碼。
產生測試資料
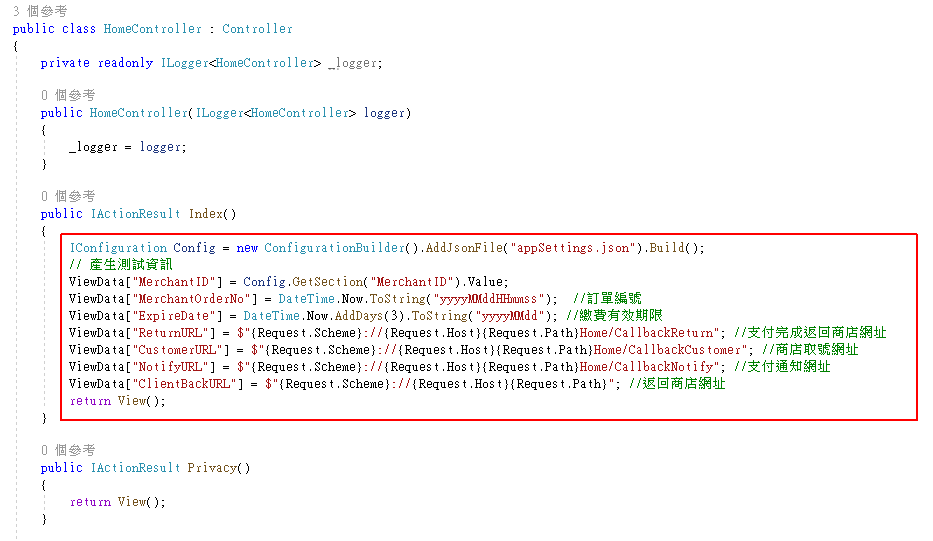
打開 \Controllers\HomeController.cs,在 Index() 內加入測試金流測試用語法:
|
1 2 3 4 5 6 7 8 9 |
IConfiguration Config = new ConfigurationBuilder().AddJsonFile("appSettings.json").Build(); // 產生測試資訊 ViewData["MerchantID"] = Config.GetSection("MerchantID").Value; ViewData["MerchantOrderNo"] = DateTime.Now.ToString("yyyyMMddHHmmss"); //訂單編號 ViewData["ExpireDate"] = DateTime.Now.AddDays(3).ToString("yyyyMMdd"); //繳費有效期限 ViewData["ReturnURL"] = $"{Request.Scheme}://{Request.Host}{Request.Path}Home/CallbackReturn"; //支付完成返回商店網址 ViewData["CustomerURL"] = $"{Request.Scheme}://{Request.Host}{Request.Path}Home/CallbackCustomer"; //商店取號網址 ViewData["NotifyURL"] = $"{Request.Scheme}://{Request.Host}{Request.Path}Home/CallbackNotify"; //支付通知網址 ViewData["ClientBackURL"] = $"{Request.Scheme}://{Request.Host}{Request.Path}"; //返回商店網址 |
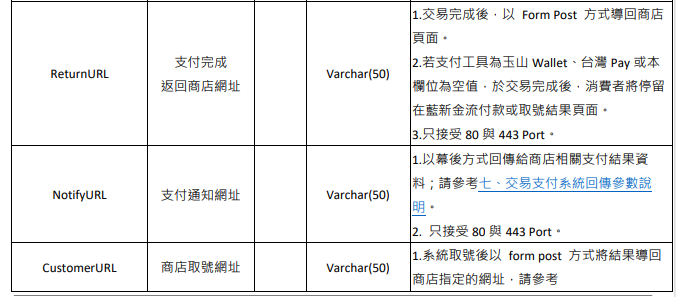
這裡是產生訂單需要的資料,呼叫 API 時需要設定接收網址,我自訂幾個接收網址,API 參數說明可在文件中查詢。
設定檔加入 API 串接金鑰
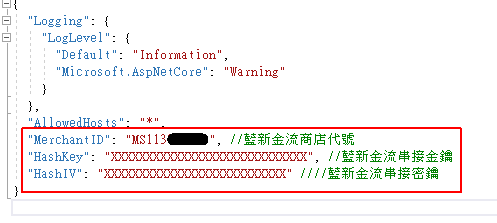
我們在藍新金流得到的「商店代號」與「API 串接金鑰」,建議放在專案設定檔裡面,打開「appsettings.json」,加入以下新設定:
|
1 2 3 |
"MerchantID": "MS000000000", //藍新金流商店代號 "HashKey": "XXXXXXXXXXXXXXXXXXXXXXXXXXXX", //藍新金流串接金鑰 "HashIV": "XXXXXXXXXXXXXXXXXXXXXXXXXX" ////藍新金流串接密鑰 |
View 訂單頁
打開 \Views\Home\Index.cshtml,先清空原有的語法,然後貼上此語法:
|
1 2 3 4 5 6 7 8 9 10 11 12 13 14 15 16 17 18 19 20 21 22 23 24 25 26 27 28 29 30 31 32 33 34 35 36 37 38 39 40 41 42 43 44 45 46 47 48 49 50 51 52 53 54 55 56 57 58 59 60 61 62 63 64 65 66 67 68 69 70 71 72 73 74 75 76 77 78 79 80 81 82 83 84 85 86 87 88 89 90 91 92 93 94 95 96 97 98 99 100 101 102 103 104 105 106 107 108 109 110 111 112 113 114 115 116 117 118 119 120 121 122 123 124 125 126 127 128 129 130 131 132 |
<h1>藍新金流串接範例</h1> <div class="card" id="app"> <div class="card-header"> API 欄位 </div> <div class="card-body"> <div class="row mb-2"> <div class="col-md-6"> <label class="form-label">商店代號</label> <input type="text" class="form-control" id="MerchantID" v-model="addForm.MerchantID"> </div> <div class="col-md-6"> <label class="form-label">訂單編號</label> <input type="text" class="form-control" id="MerchantOrderNo" v-model="addForm.MerchantOrderNo"> </div> </div> <div class="row mb-2"> <div class="col-md-6"> <label class="form-label">商品說明</label> <input type="text" class="form-control" id="ItemDesc" v-model="addForm.ItemDesc"> </div> <div class="col-md-6"> <label class="form-label">商品金額</label> <input type="text" class="form-control" id="Amt" v-model="addForm.Amt"> </div> </div> <div class="row mb-2"> <div class="col-md-6"> <label class="form-label">繳費有效期限</label> <input type="text" class="form-control" id="ExpireDate" v-model="addForm.ExpireDate"> </div> <div class="col-md-6"> <label class="form-label">付款人電子信箱</label> <input type="text" class="form-control" id="Email" v-model="addForm.Email"> </div> </div> <div class="row mb-2"> <div class="col-md-6"> <label class="form-label">支付完成返回網址</label> <input type="text" class="form-control" id="ReturnURL" v-model="addForm.ReturnURL"> </div> <div class="col-md-6"> <label class="form-label">商店取號網址</label> <input type="text" class="form-control" id="CustomerURL" v-model="addForm.CustomerURL"> </div> </div> <div class="row mb-2"> <div class="col-md-6"> <label class="form-label">支付通知網址</label> <input type="text" class="form-control" id="NotifyURL" v-model="addForm.NotifyURL"> </div> <div class="col-md-6"> <label class="form-label">返回商店網址</label> <input type="text" class="form-control" id="ClientBackURL" v-model="addForm.ClientBackURL"> </div> </div> <button type="button" class="btn btn-primary" v-on:click="SendToNewebPay('VACC')">ATM 付款</button> </div> </div> @section scripts { <script> const app = Vue.createApp({ data() { return { // 表單資料 addForm: { MerchantID: '@ViewData["MerchantID"]' //商品代號 , MerchantOrderNo: '@ViewData["MerchantOrderNo"]' , ItemDesc: '測試商品' , Amt: '100' , ExpireDate: '@ViewData["ExpireDate"]' , ReturnURL: '@ViewData["ReturnURL"]' , CustomerURL: '@ViewData["CustomerURL"]' , NotifyURL: '@ViewData["NotifyURL"]' , ClientBackURL: '@ViewData["ClientBackURL"]' , Email: 'xxxx@gmail.com' } } } , methods: { // 傳送至藍新金流 SendToNewebPay(ChannelID) { var self = this; // 組合表單資料 var postData = {}; postData['ChannelID'] = ChannelID; postData['MerchantID'] = self.addForm.MerchantID; postData['MerchantOrderNo'] = self.addForm.MerchantOrderNo; postData['ItemDesc'] = self.addForm.ItemDesc; postData['Amt'] = self.addForm.Amt; postData['ExpireDate'] = self.addForm.ExpireDate; postData['ReturnURL'] = self.addForm.ReturnURL; postData['CustomerURL'] = self.addForm.CustomerURL; postData['NotifyURL'] = self.addForm.NotifyURL; postData['ClientBackURL'] = self.addForm.ClientBackURL; postData['Email'] = self.addForm.Email; // 使用 jQuery Ajax 傳送至後端 $.ajax({ url: '@Url.Content("~/Home/SendToNewebPay")', method: 'POST', dataType: 'json', data: { inModel: postData, __RequestVerificationToken: $('@Html.AntiForgeryToken()').val() }, success: function(returnObj) { // 呼叫藍新金流 API const form = document.createElement('form'); form.method = 'post'; form.action = 'https://ccore.newebpay.com/MPG/mpg_gateway';//藍新金流驗證網址(測試環境) for (const key in returnObj) { if (returnObj.hasOwnProperty(key)) { const hiddenField = document.createElement('input'); hiddenField.type = 'hidden'; hiddenField.name = key; hiddenField.value = returnObj[key]; form.appendChild(hiddenField); } } document.body.appendChild(form); form.submit(); }, error: function(err) { alert(err.status + " " + err.statusText + '\n' + err.responseText); } }); } } }); const vm = app.mount('#app'); </script> } |
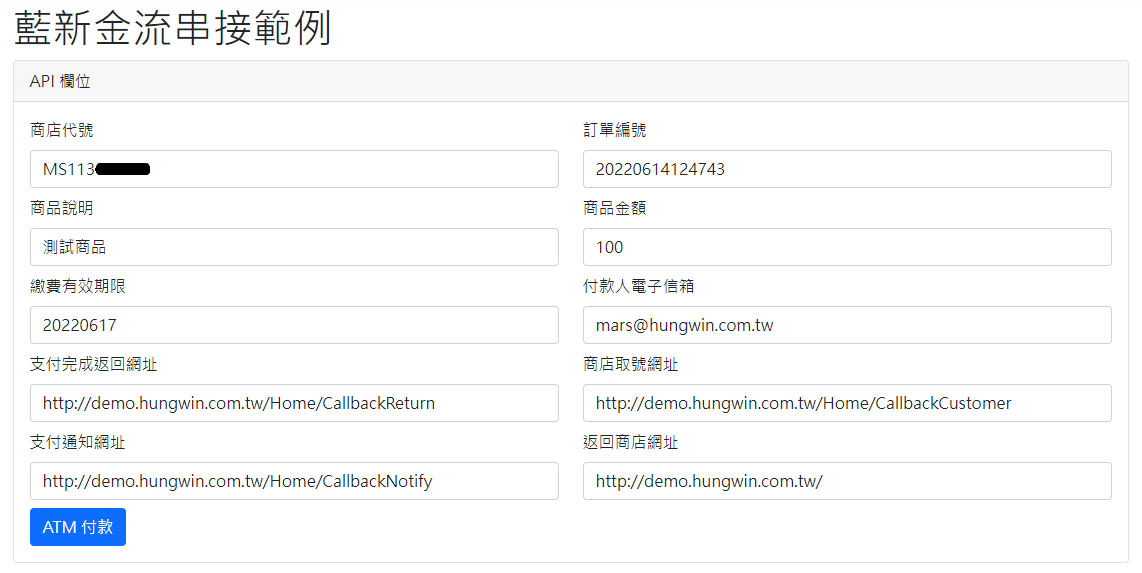
這裡設計了表單畫面,還有一個執行方法,按下方法 SendToNewebPay(ChannelID) 會呼叫至 HomeController 的 SendToNewebPay() 方法。
此頁面執行後的畫面是。
傳送至藍新金流 API
打開 \Controllers\HomeController.cs,這裡要新增一個方法,接收 View 的 SendToNewebPay() 呼叫。
加入以下語法:
|
1 2 3 4 5 6 7 8 9 10 11 12 13 14 15 16 17 18 19 20 21 22 23 24 25 26 27 28 29 30 31 32 33 34 35 36 37 38 39 40 41 42 43 44 45 46 47 48 49 50 51 52 53 54 55 56 57 58 59 60 61 62 63 64 65 66 67 68 69 70 71 |
/// <summary> /// 傳送訂單至藍新金流 /// </summary> /// <param name="inModel"></param> /// <returns></returns> [ValidateAntiForgeryToken] public IActionResult SendToNewebPay(SendToNewebPayIn inModel) { SendToNewebPayOut outModel = new SendToNewebPayOut(); // 藍新金流線上付款 //交易欄位 List<KeyValuePair<string, string>> TradeInfo = new List<KeyValuePair<string, string>>(); // 商店代號 TradeInfo.Add(new KeyValuePair<string, string>("MerchantID", inModel.MerchantID)); // 回傳格式 TradeInfo.Add(new KeyValuePair<string, string>("RespondType", "String")); // TimeStamp TradeInfo.Add(new KeyValuePair<string, string>("TimeStamp", DateTimeOffset.Now.ToOffset(new TimeSpan(8, 0, 0)).ToUnixTimeSeconds().ToString())); // 串接程式版本 TradeInfo.Add(new KeyValuePair<string, string>("Version", "2.0")); // 商店訂單編號 TradeInfo.Add(new KeyValuePair<string, string>("MerchantOrderNo", inModel.MerchantOrderNo)); // 訂單金額 TradeInfo.Add(new KeyValuePair<string, string>("Amt", inModel.Amt)); // 商品資訊 TradeInfo.Add(new KeyValuePair<string, string>("ItemDesc", inModel.ItemDesc)); // 繳費有效期限(適用於非即時交易) TradeInfo.Add(new KeyValuePair<string, string>("ExpireDate", inModel.ExpireDate)); // 支付完成返回商店網址 TradeInfo.Add(new KeyValuePair<string, string>("ReturnURL", inModel.ReturnURL)); // 支付通知網址 TradeInfo.Add(new KeyValuePair<string, string>("NotifyURL", inModel.NotifyURL)); // 商店取號網址 TradeInfo.Add(new KeyValuePair<string, string>("CustomerURL", inModel.CustomerURL)); // 支付取消返回商店網址 TradeInfo.Add(new KeyValuePair<string, string>("ClientBackURL", inModel.ClientBackURL)); // 付款人電子信箱 TradeInfo.Add(new KeyValuePair<string, string>("Email", inModel.Email)); // 付款人電子信箱 是否開放修改(1=可修改 0=不可修改) TradeInfo.Add(new KeyValuePair<string, string>("EmailModify", "0")); //信用卡 付款 if (inModel.ChannelID == "CREDIT") { TradeInfo.Add(new KeyValuePair<string, string>("CREDIT", "1")); } //ATM 付款 if (inModel.ChannelID == "VACC") { TradeInfo.Add(new KeyValuePair<string, string>("VACC", "1")); } string TradeInfoParam = string.Join("&", TradeInfo.Select(x => $"{x.Key}={x.Value}")); // API 傳送欄位 // 商店代號 outModel.MerchantID = inModel.MerchantID; // 串接程式版本 outModel.Version = "2.0"; //交易資料 AES 加解密 IConfiguration Config = new ConfigurationBuilder().AddJsonFile("appSettings.json").Build(); string HashKey = Config.GetSection("HashKey").Value;//API 串接金鑰 string HashIV = Config.GetSection("HashIV").Value;//API 串接密碼 string TradeInfoEncrypt = EncryptAESHex(TradeInfoParam, HashKey, HashIV); outModel.TradeInfo = TradeInfoEncrypt; //交易資料 SHA256 加密 outModel.TradeSha = EncryptSHA256($"HashKey={HashKey}&{TradeInfoEncrypt}&HashIV={HashIV}"); return Json(outModel); } |
這裡接收到 View 的表單後,就會組合 API 資料進行加密,等加密後會回傳至前端 View 再傳送至藍新金流 API Server。
藍新金流使用兩者加密方法,一種是 AES 可逆的加密法,另一種是 SHA256 不可逆雜湊運算
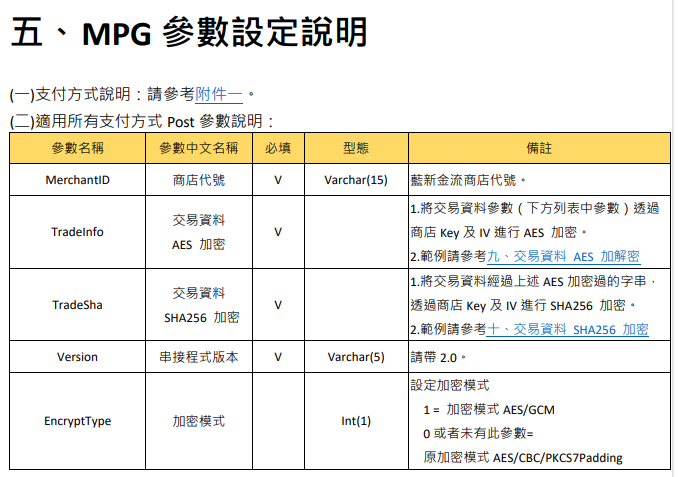
藍新金流 API 只接收 5 個欄位,可參考文件:
其中的 TradeInfo 欄位會包含訂單主要資訊,但會經過加密後才傳送出去。
補充語法內用到的加解密方法:
|
1 2 3 4 5 6 7 8 9 10 11 12 13 14 15 16 17 18 19 20 21 22 23 24 25 26 27 28 29 30 31 32 33 34 35 36 37 38 39 40 41 42 43 44 45 46 47 48 49 50 51 52 53 54 55 56 57 58 59 60 61 62 63 64 65 66 67 68 69 70 71 |
/// <summary> /// 加密後再轉 16 進制字串 /// </summary> /// <param name="source">加密前字串</param> /// <param name="cryptoKey">加密金鑰</param> /// <param name="cryptoIV">cryptoIV</param> /// <returns>加密後的字串</returns> public string EncryptAESHex(string source, string cryptoKey, string cryptoIV) { string result = string.Empty; if (!string.IsNullOrEmpty(source)) { var encryptValue = EncryptAES(Encoding.UTF8.GetBytes(source), cryptoKey, cryptoIV); if (encryptValue != null) { result = BitConverter.ToString(encryptValue)?.Replace("-", string.Empty)?.ToLower(); } } return result; } /// <summary> /// 字串加密AES /// </summary> /// <param name="source">加密前字串</param> /// <param name="cryptoKey">加密金鑰</param> /// <param name="cryptoIV">cryptoIV</param> /// <returns>加密後字串</returns> public byte[] EncryptAES(byte[] source, string cryptoKey, string cryptoIV) { byte[] dataKey = Encoding.UTF8.GetBytes(cryptoKey); byte[] dataIV = Encoding.UTF8.GetBytes(cryptoIV); using (var aes = System.Security.Cryptography.Aes.Create()) { aes.Mode = System.Security.Cryptography.CipherMode.CBC; aes.Padding = System.Security.Cryptography.PaddingMode.PKCS7; aes.Key = dataKey; aes.IV = dataIV; using (var encryptor = aes.CreateEncryptor()) { return encryptor.TransformFinalBlock(source, 0, source.Length); } } } /// <summary> /// 字串加密SHA256 /// </summary> /// <param name="source">加密前字串</param> /// <returns>加密後字串</returns> public string EncryptSHA256(string source) { string result = string.Empty; using (System.Security.Cryptography.SHA256 algorithm = System.Security.Cryptography.SHA256.Create()) { var hash = algorithm.ComputeHash(Encoding.UTF8.GetBytes(source)); if (hash != null) { result = BitConverter.ToString(hash)?.Replace("-", string.Empty)?.ToUpper(); } } return result; } |
ViewModel 欄位
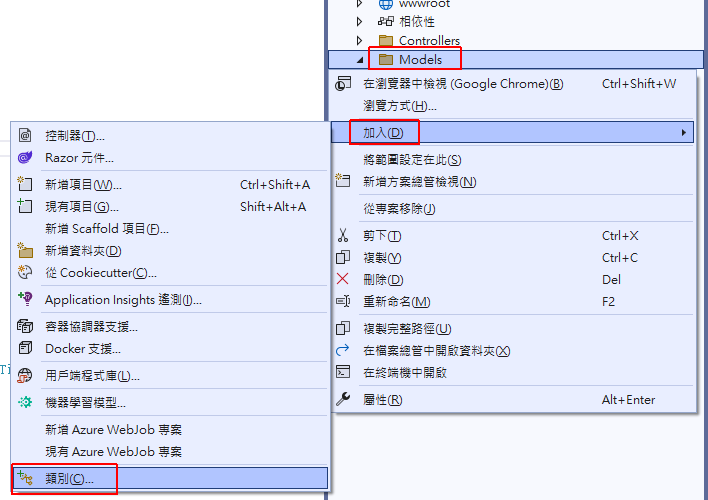
這裡要建一個 ViewModel 類別,來定義 Controller 與 View 之間的欄位定義,在 Models 按右鍵加入一個類別,取名為「HomeViewModel」。
在類別內加入 Controller 會用到的欄位:
|
1 2 3 4 5 6 7 8 9 10 11 12 13 14 15 16 17 18 19 20 21 22 |
public class SendToNewebPayIn { public string ChannelID { get; set; } public string MerchantID { get; set; } public string MerchantOrderNo { get; set; } public string ItemDesc { get; set; } public string Amt { get; set; } public string ExpireDate { get; set; } public string ReturnURL { get; set; } public string CustomerURL { get; set; } public string NotifyURL { get; set; } public string ClientBackURL { get; set; } public string Email { get; set; } } public class SendToNewebPayOut { public string MerchantID { get; set; } public string Version { get; set; } public string TradeInfo { get; set; } public string TradeSha { get; set; } } |
這時候你的程式碼應該就沒有錯誤提示了。
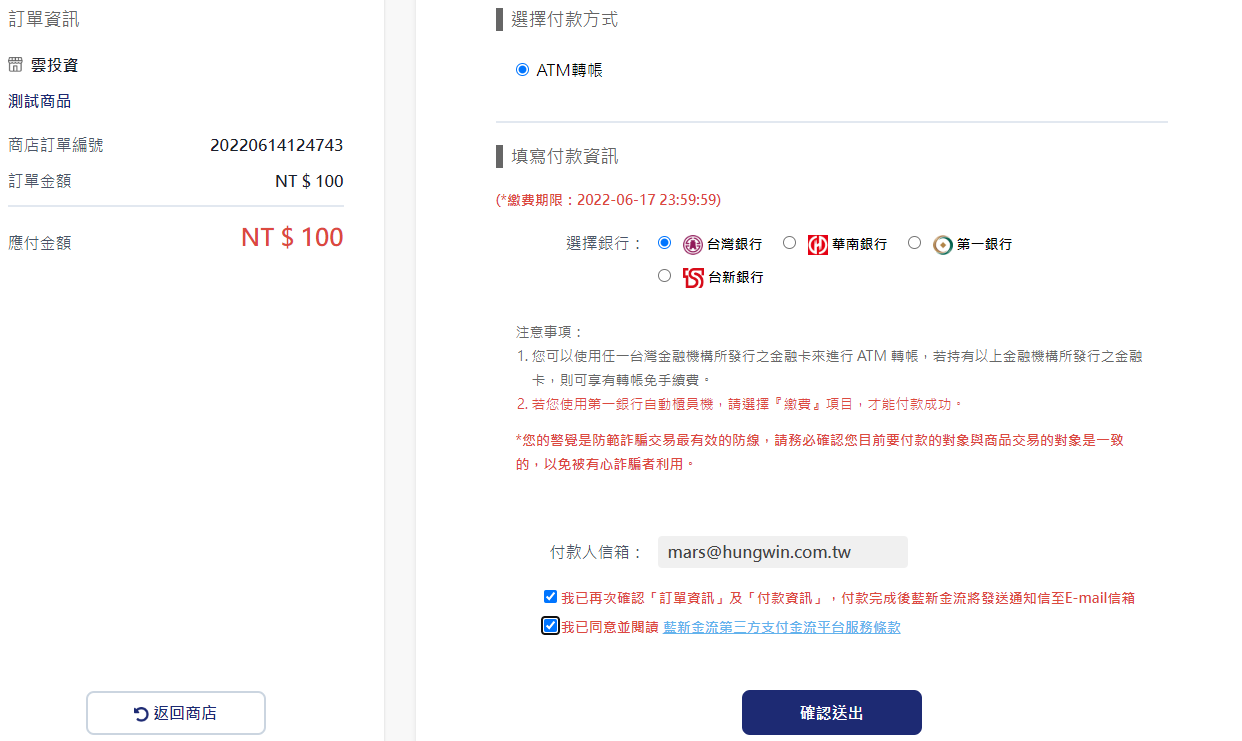
當我們執行功能傳送至藍新金流時,會顯示付款畫面。
API 返回網址接收方法
我們在前面有設定 3 個 API 返回網址,這是會從藍新金流主動呼叫的網址,所以我們要建立接收方法來取得回傳資料。
我的接收位置同樣設定在 HomeController 內,所以要新增這 3 個接收網址。
加入支付完成返回商店網址方法
在送出訂單 API 時會跳轉至藍新金流付款畫面,當使用者完成付款動作時,藍新金流會回傳呼叫我們的「支付完成返回商店網址」,這裡會接收使用者付款的狀態,我們可以從回傳資訊內查詢使用者是否已付款。
同樣在 HomeController 內加入此語法:
|
1 2 3 4 5 6 7 8 9 10 11 12 13 14 15 16 17 18 19 20 21 22 23 24 25 26 27 28 29 30 |
/// <summary> /// 支付完成返回網址 /// </summary> /// <returns></returns> public IActionResult CallbackReturn() { // 接收參數 StringBuilder receive = new StringBuilder(); foreach (var item in Request.Form) { receive.AppendLine(item.Key + "=" + item.Value + "<br>"); } ViewData["ReceiveObj"] = receive.ToString(); // 解密訊息 IConfiguration Config = new ConfigurationBuilder().AddJsonFile("appSettings.json").Build(); string HashKey = Config.GetSection("HashKey").Value;//API 串接金鑰 string HashIV = Config.GetSection("HashIV").Value;//API 串接密碼 string TradeInfoDecrypt = DecryptAESHex(Request.Form["TradeInfo"], HashKey, HashIV); NameValueCollection decryptTradeCollection = HttpUtility.ParseQueryString(TradeInfoDecrypt); receive.Length = 0; foreach (String key in decryptTradeCollection.AllKeys) { receive.AppendLine(key + "=" + decryptTradeCollection[key] + "<br>"); } ViewData["TradeInfo"] = receive.ToString(); return View(); } |
接收方法裡面要做的就是解密資料,我們傳送前有加密後再傳送,接收時也需要解密才能看到資料,解密方法是 AES,補充解密方法:
|
1 2 3 4 5 6 7 8 9 10 11 12 13 14 15 16 17 18 19 20 21 22 23 24 25 26 27 28 29 30 31 32 33 34 35 36 37 38 39 40 41 42 43 44 45 46 47 48 49 50 51 52 53 54 55 56 57 58 59 60 61 62 63 64 65 66 67 68 69 70 71 72 73 74 75 76 77 78 79 80 81 |
/// <summary> /// 16 進制字串解密 /// </summary> /// <param name="source">加密前字串</param> /// <param name="cryptoKey">加密金鑰</param> /// <param name="cryptoIV">cryptoIV</param> /// <returns>解密後的字串</returns> public string DecryptAESHex(string source, string cryptoKey, string cryptoIV) { string result = string.Empty; if (!string.IsNullOrEmpty(source)) { // 將 16 進制字串 轉為 byte[] 後 byte[] sourceBytes = ToByteArray(source); if (sourceBytes != null) { // 使用金鑰解密後,轉回 加密前 value result = Encoding.UTF8.GetString(DecryptAES(sourceBytes, cryptoKey, cryptoIV)).Trim(); } } return result; } /// <summary> /// 將16進位字串轉換為byteArray /// </summary> /// <param name="source">欲轉換之字串</param> /// <returns></returns> public byte[] ToByteArray(string source) { byte[] result = null; if (!string.IsNullOrWhiteSpace(source)) { var outputLength = source.Length / 2; var output = new byte[outputLength]; for (var i = 0; i < outputLength; i++) { output[i] = Convert.ToByte(source.Substring(i * 2, 2), 16); } result = output; } return result; } /// <summary> /// 字串解密AES /// </summary> /// <param name="source">解密前字串</param> /// <param name="cryptoKey">解密金鑰</param> /// <param name="cryptoIV">cryptoIV</param> /// <returns>解密後字串</returns> public static byte[] DecryptAES(byte[] source, string cryptoKey, string cryptoIV) { byte[] dataKey = Encoding.UTF8.GetBytes(cryptoKey); byte[] dataIV = Encoding.UTF8.GetBytes(cryptoIV); using (var aes = System.Security.Cryptography.Aes.Create()) { aes.Mode = System.Security.Cryptography.CipherMode.CBC; // 智付通無法直接用PaddingMode.PKCS7,會跳"填補無效,而且無法移除。" // 所以改為PaddingMode.None並搭配RemovePKCS7Padding aes.Padding = System.Security.Cryptography.PaddingMode.None; aes.Key = dataKey; aes.IV = dataIV; using (var decryptor = aes.CreateDecryptor()) { byte[] data = decryptor.TransformFinalBlock(source, 0, source.Length); int iLength = data[data.Length - 1]; var output = new byte[data.Length - iLength]; Buffer.BlockCopy(data, 0, output, 0, output.Length); return output; } } } |
在前端 View 我簡單顯示資料就好,加入 View 頁面 \Views\Home\CallbackReturn.cshtml 後,貼上語法:
|
1 2 3 4 5 6 7 |
<div style="width:80%"> <h1>支付回傳訊息</h1> <h3>接收參數:</h3> @Html.Raw(ViewData["ReceiveObj"]) <h3>交易訊息:</h3> @Html.Raw(ViewData["TradeInfo"]) </div> |
加入商店取號網址方法
商店取號網址會用在使用者選擇 ATM 付款時,藍新金流會呼叫這個網址,告知我們使用者要匯款的銀行代碼和帳號是多少,我們可以顯示銀行代碼和帳號給使用者知道。
同樣在 HomeController 內加入此語法:
|
1 2 3 4 5 6 7 8 9 10 11 12 13 14 15 16 17 18 19 20 21 22 23 24 25 26 27 28 |
/// <summary> /// 商店取號網址 /// </summary> /// <returns></returns> public IActionResult CallbackCustomer() { // 接收參數 StringBuilder receive = new StringBuilder(); foreach (var item in Request.Form) { receive.AppendLine(item.Key + "=" + item.Value + "<br>"); } ViewData["ReceiveObj"] = receive.ToString(); // 解密訊息 IConfiguration Config = new ConfigurationBuilder().AddJsonFile("appSettings.json").Build(); string HashKey = Config.GetSection("HashKey").Value;//API 串接金鑰 string HashIV = Config.GetSection("HashIV").Value;//API 串接密碼 string TradeInfoDecrypt = DecryptAESHex(Request.Form["TradeInfo"], HashKey, HashIV); NameValueCollection decryptTradeCollection = HttpUtility.ParseQueryString(TradeInfoDecrypt); receive.Length = 0; foreach (String key in decryptTradeCollection.AllKeys) { receive.AppendLine(key + "=" + decryptTradeCollection[key] + "<br>"); } ViewData["TradeInfo"] = receive.ToString(); return View(); } |
在前端 View 我簡單顯示資料就好,加入 View 頁面 \Views\Home\CallbackCustomer.cshtml 後,貼上語法:
|
1 2 3 4 5 6 7 |
<div style="width:80%"> <h1>商店取號網址</h1> <h3>接收參數:</h3> @Html.Raw(ViewData["ReceiveObj"]) <h3>交易訊息:</h3> @Html.Raw(ViewData["TradeInfo"]) </div> |
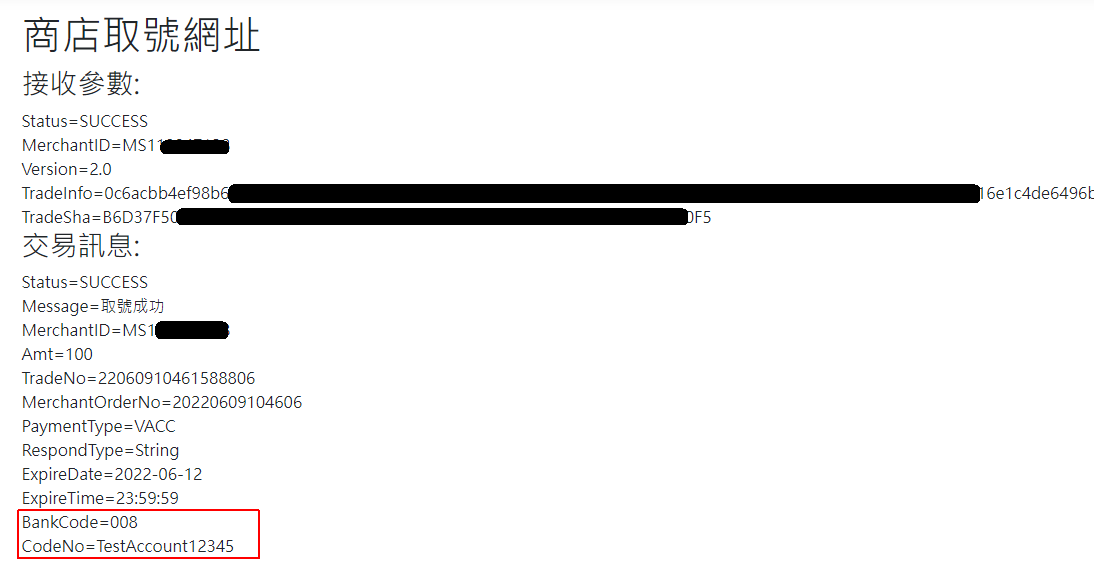
接收頁面顯示如下。
我們可以從 BankCode 和 CodeNo 知道使用者要匯款的銀行代碼和帳號。
加入支付通知網址方法
這個方法是當使用者實際付款完成時,不管是信用卡、ATM 或超商付款,會收到的通知,這個方法不需要設計顯示頁面。
例如使用者選擇 ATM 付款時,任何時間在 ATM 完成付款,我們從這方法收到通知後,寫入資料庫內紀錄使用者已付款就好。
同樣在 HomeController 內加入此語法:
|
1 2 3 4 5 6 7 8 9 10 11 12 13 14 15 16 17 18 19 20 21 22 23 24 25 26 27 28 29 |
/// <summary> /// 支付通知網址 /// </summary> /// <returns></returns> public IActionResult CallbackNotify() { // 接收參數 StringBuilder receive = new StringBuilder(); foreach (var item in Request.Form) { receive.AppendLine(item.Key + "=" + item.Value + "<br>"); } ViewData["ReceiveObj"] = receive.ToString(); // 解密訊息 IConfiguration Config = new ConfigurationBuilder().AddJsonFile("appSettings.json").Build(); string HashKey = Config.GetSection("HashKey").Value;//API 串接金鑰 string HashIV = Config.GetSection("HashIV").Value;//API 串接密碼 string TradeInfoDecrypt = DecryptAESHex(Request.Form["TradeInfo"], HashKey, HashIV); NameValueCollection decryptTradeCollection = HttpUtility.ParseQueryString(TradeInfoDecrypt); receive.Length = 0; foreach (String key in decryptTradeCollection.AllKeys) { receive.AppendLine(key + "=" + decryptTradeCollection[key] + "<br>"); } ViewData["TradeInfo"] = receive.ToString(); return View(); } |
其實這 3 個回傳接收方法解密方式都一樣,也使用相同的 API 金鑰,可以將 API 金鑰放在設定檔內保存。
然後我示範解密的方法,實際上再依各自的需求修改讀取需要的資料。
再次提醒一下,你要測試藍新金流時,首先要在測試環境下串接,測試完整後,再到正式環境再測一遍,然後要有對外網域或 IP 才可以測試,最後祝大家串接順利。
範例下載
相關學習文章
如果你在學習上有不懂的地方,需要諮詢服務,可以參考站長服務,我想辨法解決你的問題
如果文章內容有過時、不適用或錯誤的地方,幫我在下方留言通知我一下,謝謝
![[ASP.NET MVC][Vue3] 藍新金流 NewebPay API 串接教學](https://blog.hungwin.com.tw/wp-content/uploads/2023/05/core-mvc-newebpay.png)
