[ASP.NET MVC] 如何使用 MOTP 搭配 OTP Authenticator App 產生一次性密碼登入
在傳統的登入系統中總是使用帳號密碼的方式驗證身份,這種方式如果密碼不小心被盜取的話,帳號資料就會有被駭入的可能性。
為了提升帳號安全性,我們可以利用手機 App 產生一次性密碼 (MOTP),做為登入的第二道密碼使用又稱雙重驗證,這樣的優點是不容易受到攻擊,需要登入密碼及一次性密碼才可以完成登入。
這次的教學重點會放在如何與 OTP Authenticator 免費 App 搭配產生一次性密碼,並在網頁上驗證一次性密碼 (OTP)。
我寫了簡單的範例,在 C# Asp.Net 網頁產生註冊 QR Code,並利用免費的 OTP Authenticator App 掃描 QR Code 產生一次性密碼 (OTP) 後,再回到網頁上驗證身份。
範例建置環境
前端架構: Vue.js, jQuery, Bootstrap
後端架構: C# ASP.Net MVC .Net Framework
此登入範例為求重點展示 MOTP 所以沒有使用資料庫,大家了解 MOTP 規則後,可以應用在實務專案上。
文末會提供範例檔下載連結。
Contents
行動一次性密碼 (MOTP) 是什麼
行動一次性密碼(英語:Mobile One-Time Password,簡稱MOTP),又稱動態密碼或單次有效密碼,利用行動裝置上產生有效期只有一次的密碼。
有效期採計時制,通常可設定為 30 秒到兩分鐘不等,時間過了之後就失效,下次需要時再產生新密碼。
MOTP 產生密碼的方法是手機取得註冊時的密鑰 (Token) 與 Pin 之後,以當下時間利用 MD5 加密後產生密碼,並取前 6 碼為一次性密碼。
有關 MOTP 的原文介紹可參考: Mobile One Time Passwords
建立 MVC 範例專案
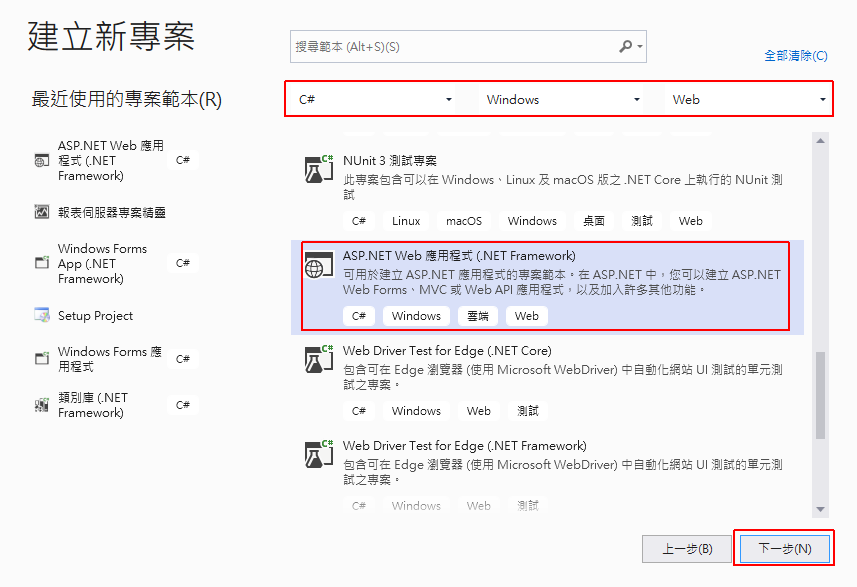
開啟 Visual Studio 2022 選擇「建立新專案」,專案類型為「ASP.NET Web 應用程式(.NET Framework)」。
輸入專案名稱及儲存位置,選擇「MVC」類型。
完成後即會開啟 MVC 的範本專案,執行「F5」,可以瀏覽 MVC 預設初始畫面。
C# 產生使用者註冊 QR Code
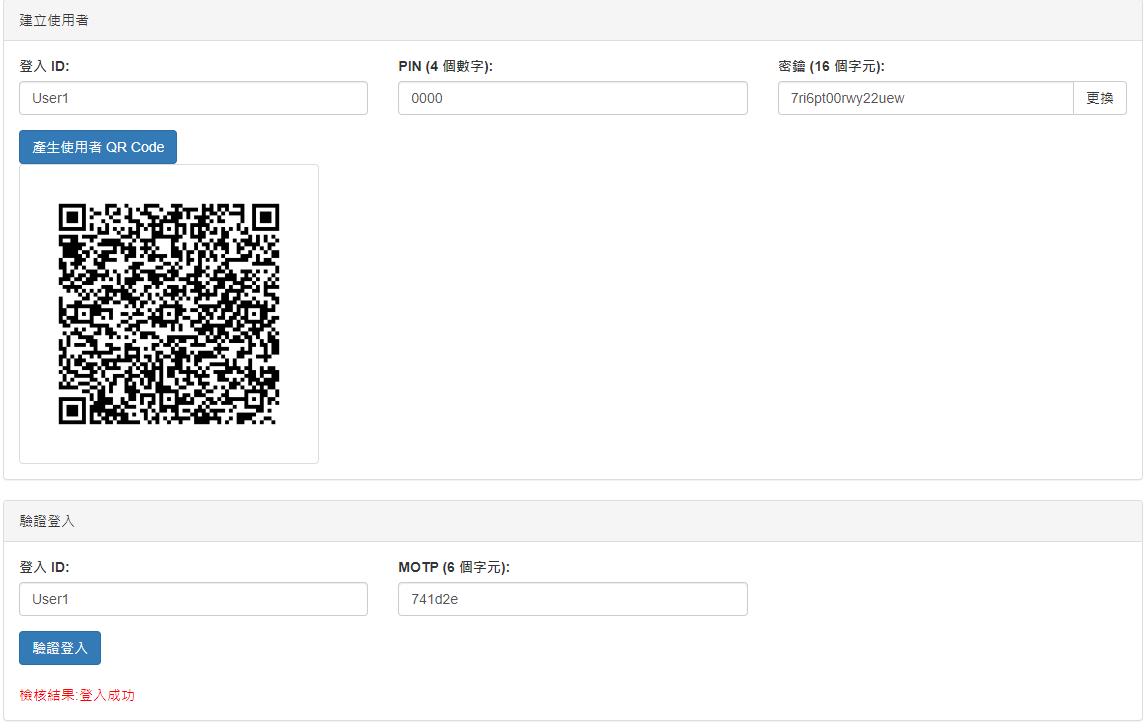
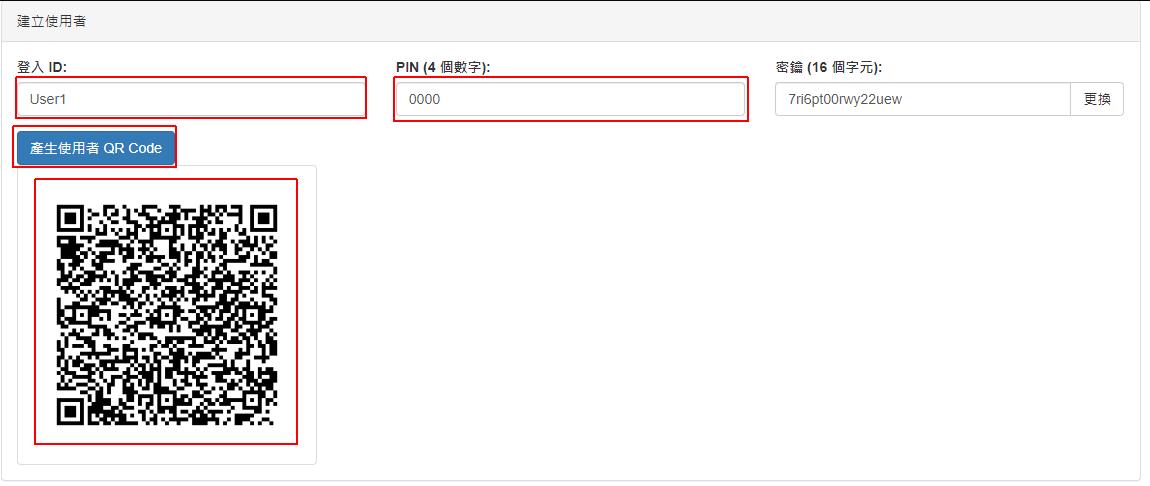
在範例頁面中輸入 UserID, Pin 及 密鑰,就可以產生 OTP Authenticator 可註冊的 QR Code。
以下是完成後的畫面,
Pin 要求為 4 碼數字。密鑰要求為 16 或 32 碼字元,範例中會隨機產生 16 碼亂數。
接下來看一下程式碼部份
引用 Vue.js 與 jquery.blockUI 底層
打開網頁版本配置頁 \Views\Shared\_Layout.cshtml,在下方的 JavaScript 引用增加兩個類別庫。
|
1 2 |
<script src="https://cdn.jsdelivr.net/npm/vue@2/dist/vue.js"></script> <script src="https://cdnjs.cloudflare.com/ajax/libs/jquery.blockUI/2.70/jquery.blockUI.js"></script> |

這兩個類別庫的順序要求就是要放在 jQuery 的後面。
前端 View 語法
我們新建專案後在 \Views\Home\Index.cshtml 貼上 View 語法。
|
1 2 3 4 5 6 7 8 9 10 11 12 13 14 15 16 17 18 19 20 21 22 23 24 25 26 27 28 29 30 31 32 33 34 35 36 37 38 39 40 41 42 43 44 45 46 47 48 49 50 51 52 53 54 55 56 57 58 59 60 61 62 63 64 65 66 67 68 69 70 71 72 73 74 75 76 77 78 79 80 81 82 83 84 85 86 87 88 89 90 91 92 93 94 95 96 97 98 99 100 101 102 103 104 105 106 107 108 109 110 111 112 113 114 115 116 117 118 119 120 121 122 123 124 125 126 127 128 129 130 131 132 133 134 135 136 137 138 139 140 141 142 143 144 145 146 147 148 149 150 151 152 153 154 155 156 157 158 159 160 161 162 163 164 165 166 167 |
<main id="Page"> <div class="panel panel-default"> <div class="panel-heading">建立使用者</div> <div class="panel-body"> <div class="row"> <div class="col-md-4"> <div class="form-group"> <label>登入 ID:</label> <input type="text" class="form-control" v-model="form.UserID"> </div> </div> <div class="col-md-4"> <div class="form-group"> <label>PIN (4 個數字):</label> <input type="text" class="form-control" v-model="form.UserPin"> </div> </div> <div class="col-md-4"> <label>密鑰 (16 個字元):</label> <div class="input-group"> <input type="text" class="form-control" v-model="form.UserKey"> <div class="input-group-btn"> <button class="btn btn-default" type="button" v-on:click="ChgKey()"> 更換 </button> </div> </div> </div> </div> <button type="button" class="btn btn-primary" v-on:click="GenUserQRCode()">產生使用者 QR Code</button> <br /> <img class="img-thumbnail" style="width: 300px;height:300px;" v-bind:src="form.QrCodePath"> </div> </div> <div class="panel panel-default"> <div class="panel-heading">驗證登入</div> <div class="panel-body"> <div class="row"> <div class="col-md-4"> <div class="form-group"> <label>登入 ID:</label> <input type="text" class="form-control" v-model="form.UserID"> </div> </div> <div class="col-md-4"> <div class="form-group"> <label>MOTP (6 個字元):</label> <input type="text" class="form-control" v-model="form.MOTP"> </div> </div> </div> <button type="button" class="btn btn-primary" v-on:click="CheckLogin()">驗證登入</button> <br /><br /> <span style="color:red;">檢核結果:{{form.CheckResult}}</span> </div> </div> </main> @section scripts{ <script> var Page = new Vue({ el: '#Page' , data: function () { var data = { form: {} }; data.form = { UserID: 'User1' , UserPin: '0000' , UserKey: '' , QrCodePath: '' , MOTP: '' , CheckResult:'' } return data; } , created: function () { var self = this; self.ChgKey(); } , methods: { GetToken: function () { var token = '@Html.AntiForgeryToken()'; token = $(token).val(); return token; } // 產生使用者 QR Code , GenUserQRCode: function () { var self = this; var postData = {}; postData['UserID'] = self.form.UserID; postData['UserPin'] = self.form.UserPin; postData['UserKey'] = self.form.UserKey; $.blockUI({ message: '處理中...' }); $.ajax({ url:'@Url.Content("~/Home/GenUserQRCode")', method:'POST', dataType:'json', data: { inModel: postData, __RequestVerificationToken: self.GetToken() }, success: function (datas) { if (datas.ErrMsg != '') { alert(datas.ErrMsg); $.unblockUI(); return; } self.form.QrCodePath = datas.FileWebPath; $.unblockUI(); }, error: function (err) { alert(err.responseText); $.unblockUI(); }, }); } // 驗證登入 , CheckLogin: function () { var self = this; var postData = {}; postData['UserID'] = self.form.UserID; postData['UserPin'] = self.form.UserPin; postData['UserKey'] = self.form.UserKey; postData['MOTP'] = self.form.MOTP; $.blockUI({ message: '處理中...' }); $.ajax({ url:'@Url.Content("~/Home/CheckLogin")', method:'POST', dataType:'json', data: { inModel: postData, __RequestVerificationToken: self.GetToken() }, success: function (datas) { if (datas.ErrMsg != '') { alert(datas.ErrMsg); $.unblockUI(); return; } self.form.CheckResult = datas.CheckResult; $.unblockUI(); }, error: function (err) { alert(err.responseText); $.unblockUI(); }, }); } // 更換密鑰 , ChgKey: function () { var self = this; var key = self.MarkRan(16); self.form.UserKey = key; } // 隨機密鑰 , MarkRan: function (length) { var result = ''; var characters = 'abcdefghijklmnopqrstuvwxyz0123456789'; var charactersLength = characters.length; for (var i = 0; i < length; i++) { result += characters.charAt(Math.floor(Math.random() * charactersLength)); } return result; } } }) </script> } |
修改 Controller
接著在 \Controllers\HomeController.cs 增加 Action 來回傳前端的要求。
|
1 2 3 4 5 6 7 8 9 10 11 12 13 14 15 16 17 18 19 20 21 22 23 24 25 26 27 28 29 30 31 32 33 34 35 36 37 38 39 40 41 42 43 44 45 46 47 48 49 50 51 52 53 54 55 56 57 58 59 60 61 62 63 64 65 66 67 68 69 70 71 72 73 74 75 76 77 78 79 80 81 82 83 84 85 86 87 88 89 90 91 92 93 94 95 96 97 98 99 100 101 102 103 104 105 106 107 108 109 110 111 112 113 114 115 116 117 118 119 120 |
public decimal timeStampEpoch = (decimal)Math.Round((DateTime.UtcNow.Subtract(new DateTime(1970, 1, 1))).TotalSeconds, 0); //Unix timestamp /// <summary> /// 產生使用者 QR Code /// </summary> /// <param name="inModel"></param> /// <returns></returns> [ValidateAntiForgeryToken] public ActionResult GenUserQRCode(GenUserQRCodeIn inModel) { GenUserQRCodeOut outModel = new GenUserQRCodeOut(); outModel.ErrMsg = ""; if (inModel.UserKey.Length != 16) { outModel.ErrMsg = "密鑰長度需為 16 碼"; } if (inModel.UserPin.Length != 4) { outModel.ErrMsg = "PIN 長度需為 4 碼"; } int t = 0; if (int.TryParse(inModel.UserPin, out t) == false) { outModel.ErrMsg = "PIN 需為數字"; } if (outModel.ErrMsg == "") { // 產生註冊資料 For OTP Authenticator string motpUser = "<?xml version=\"1.0\" encoding=\"utf-8\"?><SSLOTPAuthenticator><mOTPProfile><ProfileName>{0}</ProfileName><PINType>0</PINType><PINSecurity>0</PINSecurity><Secret>{1}</Secret><AlgorithmMode>0</AlgorithmMode></mOTPProfile></SSLOTPAuthenticator>"; motpUser = string.Format(motpUser, inModel.UserID, inModel.UserKey); // QR Code 設定 BarcodeWriter bw = new BarcodeWriter { Format = BarcodeFormat.QR_CODE, Options = new QrCodeEncodingOptions //設定大小 { Height = 300, Width = 300, } }; //產生QRcode var img = bw.Write(motpUser); //來源網址 string FileName = "qrcode.png"; //產生圖檔名稱 Bitmap myBitmap = new Bitmap(img); string FileWebPath = Server.MapPath("~/") + FileName; //完整路徑 myBitmap.Save(FileWebPath, ImageFormat.Png); string FileWebUrl = Url.Content("~/") + FileName; // 產生網頁可看到的路徑 outModel.FileWebPath = FileWebUrl; } // 輸出json return Json(outModel); } /// <summary> /// 驗證登入 /// </summary> /// <param name="inModel"></param> /// <returns></returns> [ValidateAntiForgeryToken] public ActionResult CheckLogin(CheckLoginIn inModel) { CheckLoginOut outModel = new CheckLoginOut(); outModel.ErrMsg = ""; if (inModel.MOTP == null || inModel.MOTP.Length != 6) { outModel.ErrMsg = "MOTP 長度需為 6 碼"; } if (inModel.UserKey.Length != 16) { outModel.ErrMsg = "密鑰長度需為 16 碼"; } if (inModel.UserPin.Length != 4) { outModel.ErrMsg = "PIN 長度需為 4 碼"; } int t = 0; if (int.TryParse(inModel.UserPin, out t) == false) { outModel.ErrMsg = "PIN 需為數字"; } if (outModel.ErrMsg == "") { outModel.CheckResult = "登入失敗"; String otpCheckValueMD5 = ""; decimal timeWindowInSeconds = 60; //1 分鐘前的 motp 都檢查 for (decimal i = timeStampEpoch - timeWindowInSeconds; i <= timeStampEpoch + timeWindowInSeconds; i++) { otpCheckValueMD5 = (Md5Hash(((i.ToString()).Substring(0, (i.ToString()).Length - 1) + inModel.UserKey + inModel.UserPin))).Substring(0, 6); if (inModel.MOTP.ToLower() == otpCheckValueMD5.ToLower()) { outModel.CheckResult = "登入成功"; break; } } } // 輸出json return Json(outModel); } /// <summary> /// MD5 編碼 /// </summary> /// <param name="inputString"></param> /// <returns></returns> public string Md5Hash(string inputString) { using (MD5 md5 = MD5.Create()) { byte[] input = Encoding.UTF8.GetBytes(inputString); byte[] hash = md5.ComputeHash(input); string md5Str = BitConverter.ToString(hash).Replace("-", ""); return md5Str; } } |
引用 Zxing.Net 套件
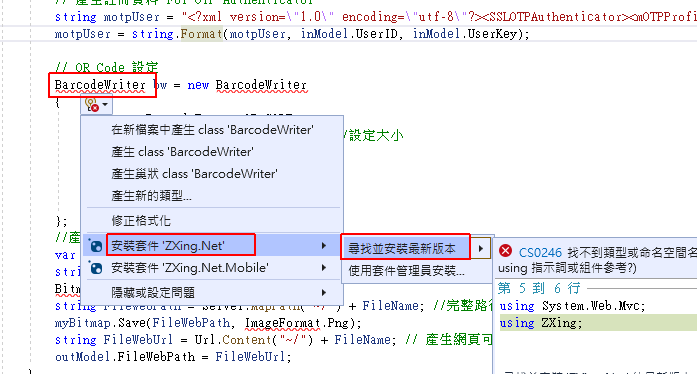
BarcodeWriter 是第三方套件,貼上程式碼時會錯誤發生,VS 有建議可安裝套件解決,在建議選項內有「安裝套件 ‘ZXing.Net’ -> 尋找並安裝最新版本」,點擊後會自動安裝最新版本。
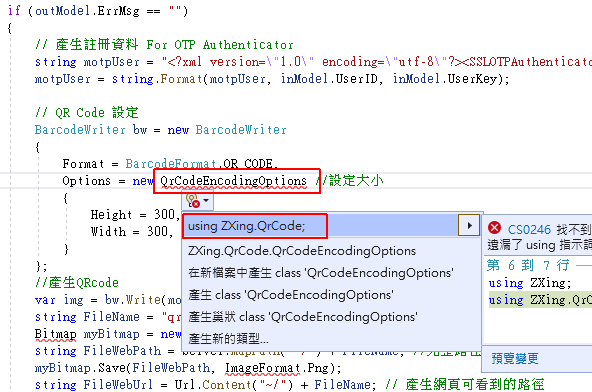
QrCodeEncodingOptions 一樣使用建議選擇安裝套件。
建立 Model
剛剛在 HomeController 建立的方法,有定義新的參數及回傳類別,這些類別要放在 Model 裡面,
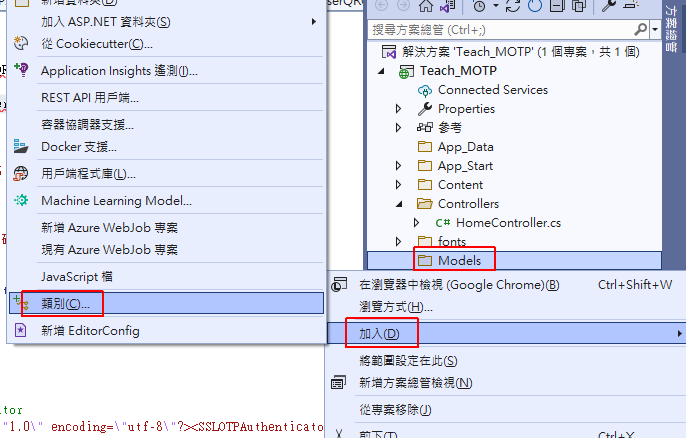
在 Models 目錄按右鍵選「加入」->「類別」。
輸入名稱為「HomeModel」,按「新增」。
然後在「HomeModel」的類別裡面,再加入新的類別。
|
1 2 3 4 5 6 7 8 9 10 11 12 13 14 15 16 17 18 19 20 21 22 23 24 25 26 |
public class GenUserQRCodeIn { public string UserID { get; set; } public string UserPin { get; set; } public string UserKey { get; set; } } public class GenUserQRCodeOut { public string ErrMsg { get; set; } public string FileWebPath { get; set; } } public class CheckLoginIn { public string UserID { get; set; } public string UserPin { get; set; } public string UserKey { get; set; } public string MOTP { get; set; } } public class CheckLoginOut { public string ErrMsg { get; set; } public string CheckResult { get; set; } } |
程式產生 QR Code 之後,接下來就要利用 OTP Authenticator App 來操作了。
手機下載安裝 OTP Authenticator
- App 名稱: OTP Authenticator
- 官網連結: https://www.swiss-safelab.com/en-us/products/otpauthenticator.aspx
- App 性質: 免費軟體
- iOS App Store 下載: https://apps.apple.com/tw/app/otp-authenticator/id915359210
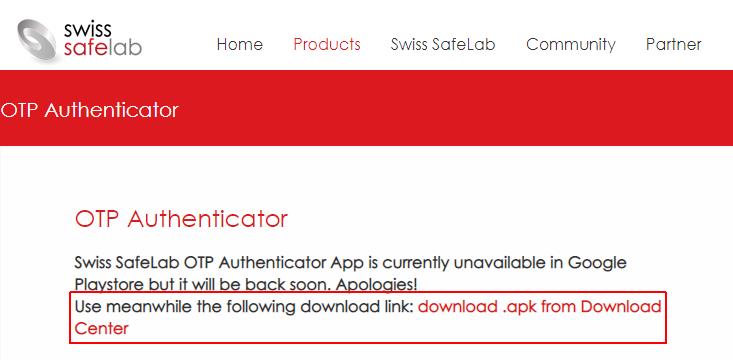
- Android APK 下載: https://www.swiss-safelab.com/en-us/community/downloadcenter.aspx?Command=Core_Download&EntryId=1105
OTP Authenticator 是針對 Mobile-OTP,行動裝置雙因素身份驗證規則而開發的免費 App,由 Swiss SafeLab 所開發。
Android 版本在 Google Play 沒有連結,若下載連結失效,可至官網重新下載 Apk
OTP Authenticator 註冊使用者帳號
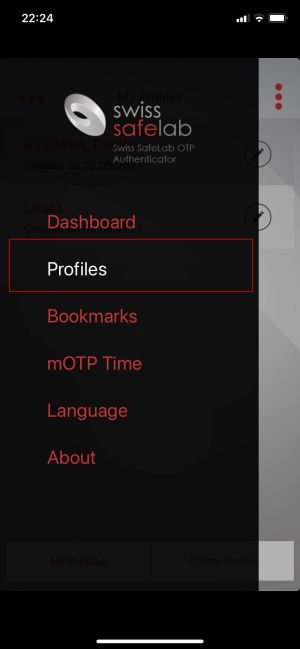
打開 OTP Authenticator 後,左側選單點擊「Profiles」
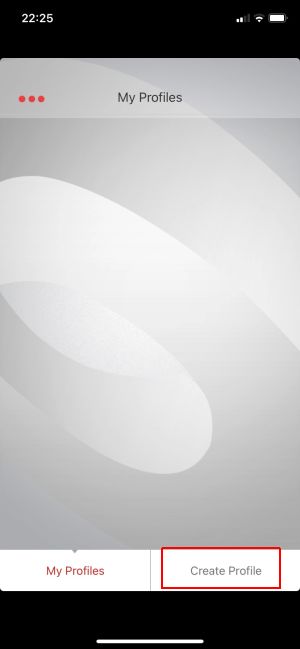
下方點擊「Create Profile」
點擊「Scan Profile」
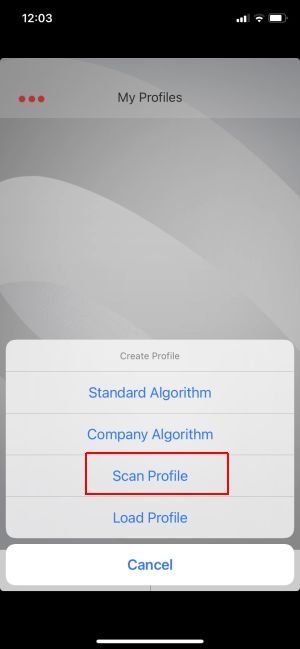
掃描網頁上提供的 QR Code
完成後即會增加使用者列表
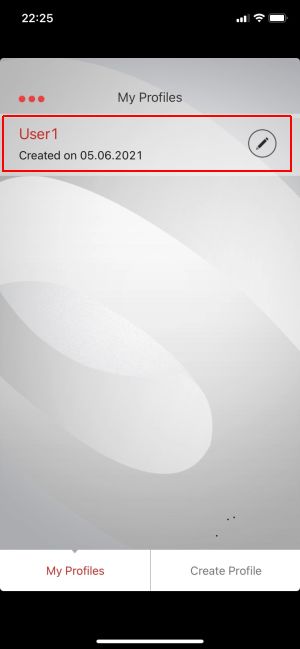
點擊名稱後,輸入註冊時的 Pin 4位數字,例如範例上的 「0000」
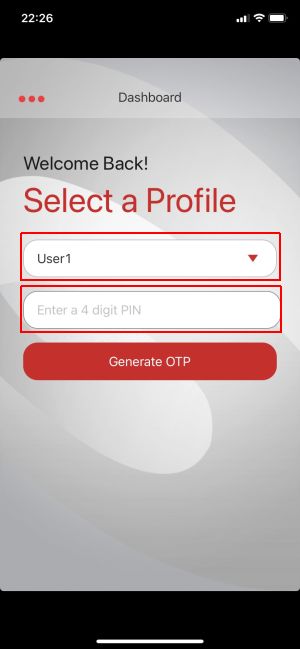
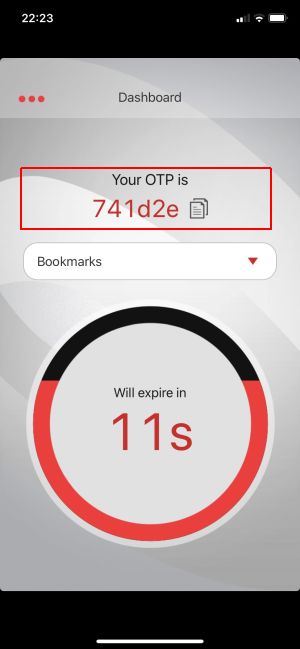
App 即會產生一次性密碼,每 30 秒會更換新密碼。此新密碼在網頁上使用者登入時會用到。
網頁使用者登入驗證 MOTP
當 App 安裝好之後,我們就可以回到網頁上來測試一下,在畫面上輸入登入 ID,然後 MOTP 就輸入手機上出現的一次性密碼,再驗證登入是否成功。
看到「登入成功」,就表示成功了,我們已經順利的從 App 產生一次性密碼,然後在網頁上驗證成功了。
在驗證 OTP 時需要確認手機的時區和伺服器時區是一樣的,這樣才能檢查過去時間內有效的 OTP。
檢核使用 timestamp 加上密鑰及 Pin 用 MD5 加密,再取前 6 碼做為一次性密碼。
範例中以輸入的 OTP 與過去 1 分鐘內其中一組密碼相等即為登入成功。
重點整理
- 產生使用者註冊 QR Code
- 安裝 OTP Authenticator
- OTP 掃描 QR Code
- 網頁登入驗證身份
範例下載
相關學習文章
如果你在學習上有不懂的地方,需要諮詢服務,可以參考站長服務,我想辨法解決你的問題
如果文章內容有過時、不適用或錯誤的地方,幫我在下方留言通知我一下,謝謝
![[ASP.NET MVC] 如何使用 MOTP 搭配 OTP Authenticator App 產生一次性密碼登入](https://blog.hungwin.com.tw/wp-content/uploads/2021/06/csharp-motp-otp-authenticator-login.png)


在驗證登入的 javascript 中, 有看到判斷UserKey, 但在 HTML中, 只有 UserID 及MOTP, 是不是我遺漏了什麼?
因為通常 UserKey 和 UserPin 會記錄在資料庫內做驗證使用,所以畫面上沒有放HTML,也是模擬正常登入只需要 UserId 及 MOTP,而驗證時會用到,所以我直接讀建立使用者區的 UserKey 及 UserPin
了解, 感謝