[ASP.NET Core MVC][Vue3][Dapper] 前後台網站公告範例 – 後台查詢頁面及分頁教學 #CH1
網站開發常見的一種功能是在後台新增維護資料,然後在前台顯示資料,類似網站公告或最新消息功能,此次教學將會教你如何建立後台公告維護界面,並在前台顯示資料。
此教學範例會建立 ASP.NET Core MVC 新專案,新增一個後台公告管理頁面,透過查詢顯示資料庫內的公告資料。
查詢全部資料呈現是簡單的動作,而我會加上分頁查詢相對是較複雜的動作,我會示範一個我常用的分頁方法給各位參考。
此範例使用 ASP.NET Core MVC 版本是 .NET6,前端使用 Vue3 框架,後端資料庫使用 SQL Server 2019,使用 Dapper 套件連線,文末有範例可以下載。
建立專案
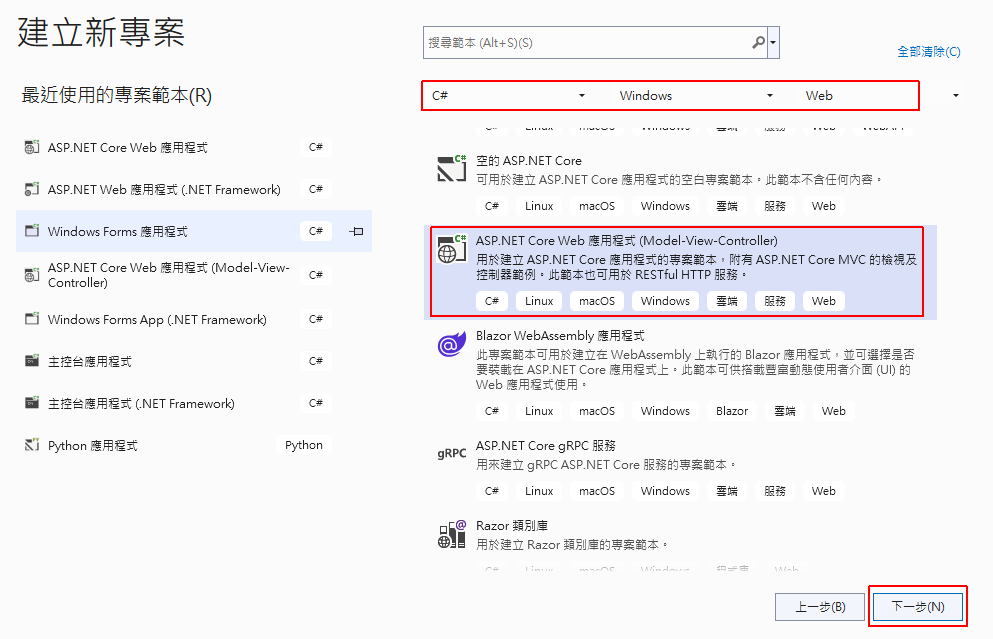
開啟 Visual Studio 2022,建立新專案為「ASP.NET Core Web 應用程式 (Model-View-Controller)」。
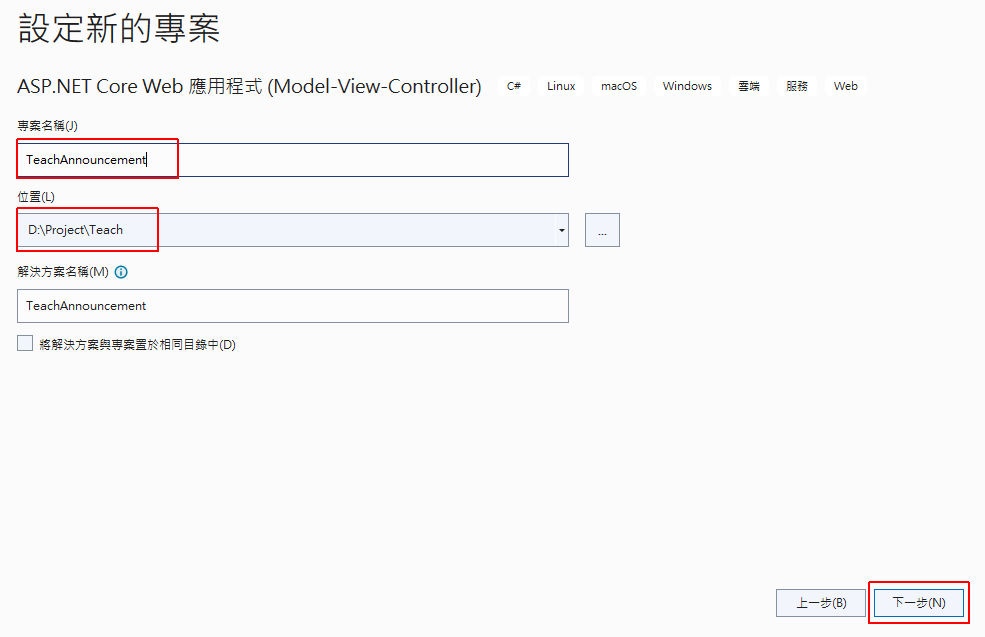
輸入專案名稱、路徑。
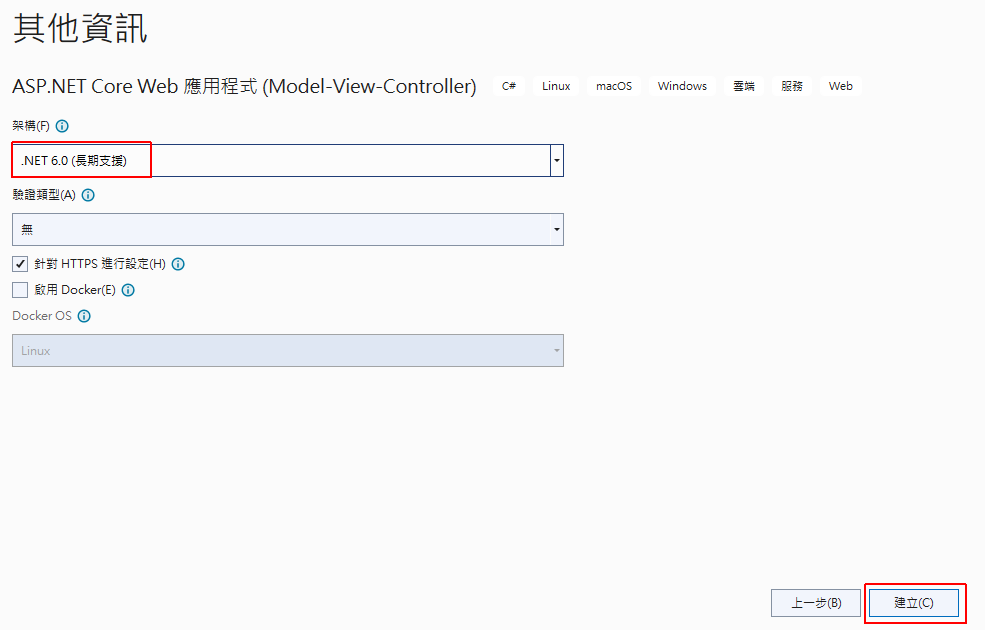
架構選擇「.NET 6.0」版本,按下「建立」就會建立此專案。
設計查詢頁面
這裡我們新增一個 Controller 專門處理後台的公告維護。
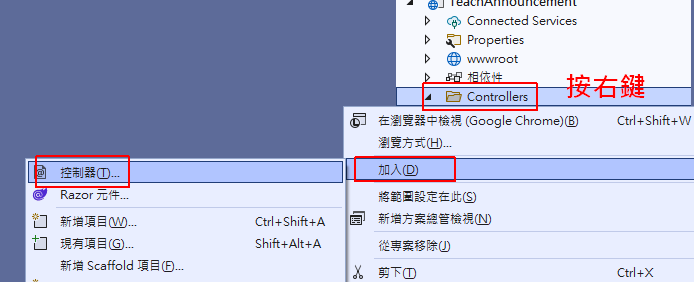
在 Controllers 按右鍵新增一個「控制器」。
選擇「MVC 控制器 – 空白」, 取名為「AdmAnnoController」。
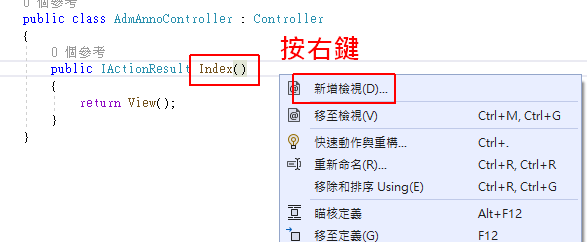
在 \Controllers\AdmAnnoController.cs 檔案的 Index() 按右鍵選「新增檢視」,可以新增它的 View 頁面。
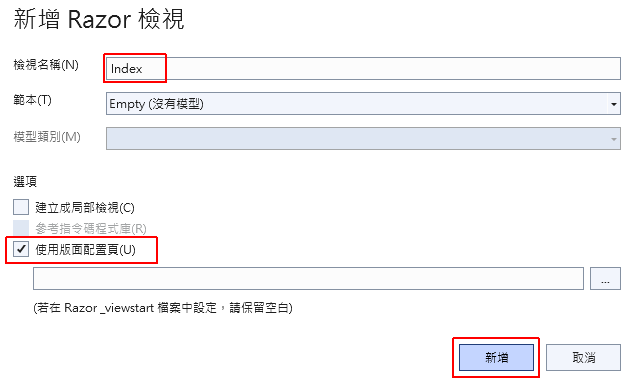
選擇「Razor 檢視」,名稱維持預設「Index」,勾選「使用版面配置頁」,按「新增」。
畫面設計我們就從 Bootstrap 複製一些適合查詢顯示的範例到 View 裡面。
我用到的樣式有 Card, Form, Table, Button
我設計了查詢畫面,直接使用以下語法取代 \Views\AdmAnno\Index.cshtml 原有的語法。
|
1 2 3 4 5 6 7 8 9 10 11 12 13 14 15 16 17 18 19 20 21 22 23 24 25 26 27 28 29 30 31 32 33 34 35 36 37 38 39 40 41 |
<div id="QueryPanel" class="card"> <div class="card-header"> 公告維護 </div> <div class="card-body"> <div class="row"> <div class="col-auto"> <label for="AnnoSubject" class="col-form-label">公告主題</label> </div> <div class="col-auto"> <input type="text" id="AnnoSubject" class="form-control"> </div> <div class="col-auto"> <label for="AnnoStatus" class="col-form-label">公告狀態</label> </div> <div class="col-auto"> <select class="form-select" id="AnnoStatus"> <option value="1">顯示</option> <option value="0">隱藏</option> </select> </div> </div> </div> <div class="card-header"> <button type="button" class="btn btn-primary">查詢</button> </div> <div class="card-body"> <table class="table"> <thead> <tr> <th>公告日期</th> <th>公告主題</th> <th>公告內容</th> <th>公告狀態</th> </tr> </thead> <tbody> </tbody> </table> </div> </div> |
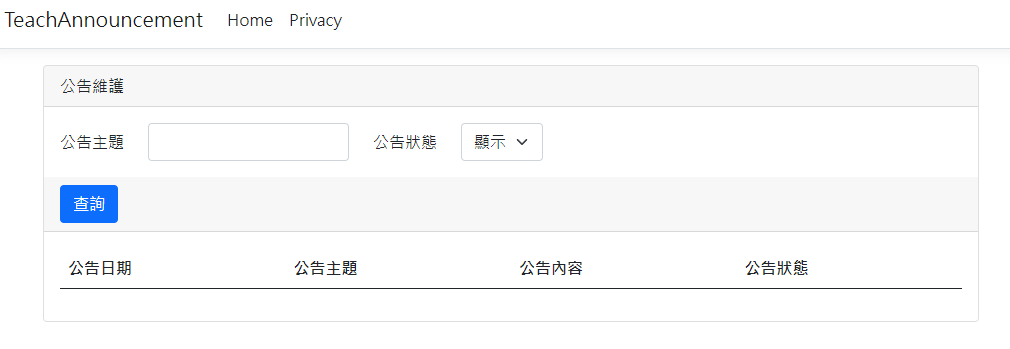
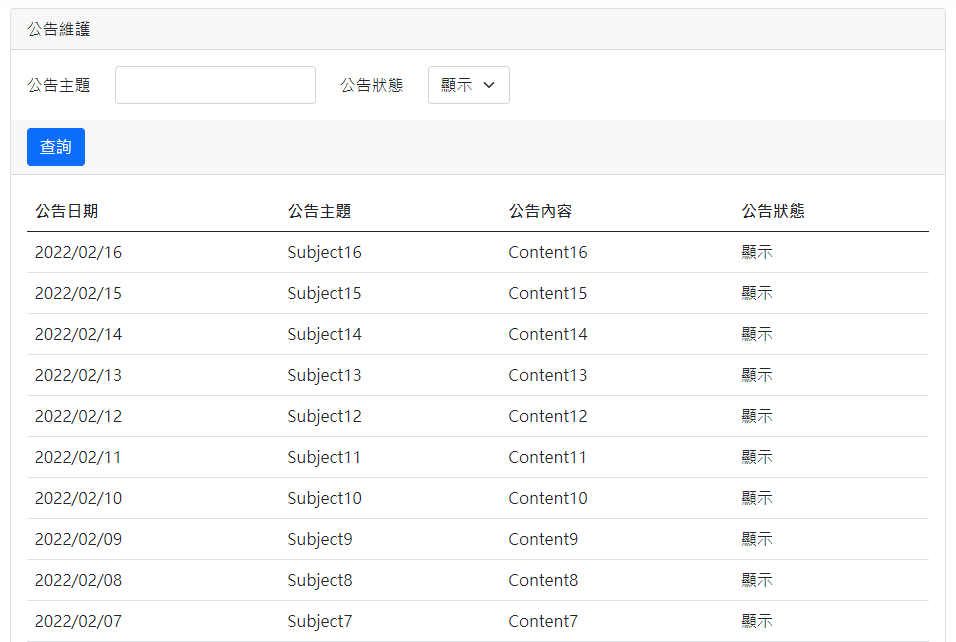
按 F5 執行網頁後就會看到以下的畫面。
做到這裡主要是先設計我們的畫面,接下來就要設計資料庫然後開始寫程式碼了。
資料庫語法
我們會使用 SQL Server 來當作資料來源,我已經新增好 “Teach” 的資料庫了,接著以下語法新增公告 Table。
|
1 2 3 4 5 6 7 8 9 |
CREATE TABLE [dbo].[Announcement] ( [Pkey] int IDENTITY(1, 1) NOT NULL, [AnnoDate] date NOT NULL, [AnnoSubject] nvarchar(50) NOT NULL, [AnnoContent] nvarchar(1000) NOT NULL, [AnnoStatus] smallint NOT NULL, PRIMARY KEY CLUSTERED ([Pkey] ASC) ON [PRIMARY] ) |
有了 Table 之後,這裡我就直接新增 16 筆測試資料,因為我們第一個功能是查詢,有了資料才能看出結果。
|
1 2 3 4 5 6 7 8 9 10 11 12 13 14 15 16 |
insert into [dbo].[Announcement]([AnnoDate],[AnnoSubject],[AnnoContent],[AnnoStatus]) values ('2022-02-01 00:00:00',N'Subject1',N'Content1',1) insert into [dbo].[Announcement]([AnnoDate],[AnnoSubject],[AnnoContent],[AnnoStatus]) values ('2022-02-02 00:00:00',N'Subject2',N'Content2',1) insert into [dbo].[Announcement]([AnnoDate],[AnnoSubject],[AnnoContent],[AnnoStatus]) values ('2022-02-03 00:00:00',N'Subject3',N'Content3',1) insert into [dbo].[Announcement]([AnnoDate],[AnnoSubject],[AnnoContent],[AnnoStatus]) values ('2022-02-04 00:00:00',N'Subject4',N'Content4',1) insert into [dbo].[Announcement]([AnnoDate],[AnnoSubject],[AnnoContent],[AnnoStatus]) values ('2022-02-05 00:00:00',N'Subject5',N'Content5',1) insert into [dbo].[Announcement]([AnnoDate],[AnnoSubject],[AnnoContent],[AnnoStatus]) values ('2022-02-06 00:00:00',N'Subject6',N'Content6',1) insert into [dbo].[Announcement]([AnnoDate],[AnnoSubject],[AnnoContent],[AnnoStatus]) values ('2022-02-07 00:00:00',N'Subject7',N'Content7',1) insert into [dbo].[Announcement]([AnnoDate],[AnnoSubject],[AnnoContent],[AnnoStatus]) values ('2022-02-08 00:00:00',N'Subject8',N'Content8',1) insert into [dbo].[Announcement]([AnnoDate],[AnnoSubject],[AnnoContent],[AnnoStatus]) values ('2022-02-09 00:00:00',N'Subject9',N'Content9',1) insert into [dbo].[Announcement]([AnnoDate],[AnnoSubject],[AnnoContent],[AnnoStatus]) values ('2022-02-10 00:00:00',N'Subject10',N'Content10',1) insert into [dbo].[Announcement]([AnnoDate],[AnnoSubject],[AnnoContent],[AnnoStatus]) values ('2022-02-11 00:00:00',N'Subject11',N'Content11',1) insert into [dbo].[Announcement]([AnnoDate],[AnnoSubject],[AnnoContent],[AnnoStatus]) values ('2022-02-12 00:00:00',N'Subject12',N'Content12',1) insert into [dbo].[Announcement]([AnnoDate],[AnnoSubject],[AnnoContent],[AnnoStatus]) values ('2022-02-13 00:00:00',N'Subject13',N'Content13',1) insert into [dbo].[Announcement]([AnnoDate],[AnnoSubject],[AnnoContent],[AnnoStatus]) values ('2022-02-14 00:00:00',N'Subject14',N'Content14',1) insert into [dbo].[Announcement]([AnnoDate],[AnnoSubject],[AnnoContent],[AnnoStatus]) values ('2022-02-15 00:00:00',N'Subject15',N'Content15',1) insert into [dbo].[Announcement]([AnnoDate],[AnnoSubject],[AnnoContent],[AnnoStatus]) values ('2022-02-16 00:00:00',N'Subject16',N'Content16',1) |
專案基礎設定
這裡會先針對 ASP.NET Core MVC 專案增加一些基礎設定,以方便後續開發。
加入 Vue3 套件
Vue3 是前端控制欄位的框架類別庫,打開 \Views\Shared\_Layout.cshtml 檔案,在下方 JavaScript 引用增加 Vue3 類別庫語法,順序的要求要放在 jQuery 之後才行。
<script src="https://unpkg.com/vue@3"></script>
當在 Layout 加上 Vue3 引用後,我們就可以在所有的頁面使用 Vue3 語法了,此引用語法來源可參考官方文件。
加入 jQuery BlockUI Plugin 套件
jQuery BlockUI 是讓前端向後端呼叫時,暫時鎖定前端畫面,以防止二次點擊等問題。
在剛剛加入 Vue3 套件的下方,加入引用語法。
<script src="https://malsup.github.io/jquery.blockUI.js"></script>
停用 Json 回傳預設小寫設定
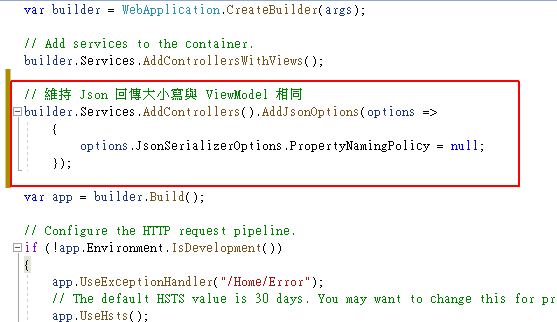
在 .NET Framework 使用 Json 回傳時,前端收到的 Json 物件大小寫設定與 ViewModel 相同,而在 .NET Core 時則預設開頭為小寫 (駝峰式命名),這裡我都會調整成與 ViewModel 相同。
在 Program.cs 加入以下語法:
|
1 2 3 4 5 |
// 維持 Json 回傳大小寫與 ViewModel 相同 builder.Services.AddControllers().AddJsonOptions(options => { options.JsonSerializerOptions.PropertyNamingPolicy = null; }); |
查詢公告
這裡會開始寫程式碼,在設計畫面上有 2 個查詢欄位,1 個查詢按鈕,當按下查詢鈕後,帶入查詢條件,從資料庫內讀取資料呈現。
View 附加 Vue3 語法
剛剛我們在 Index.cshtml 使用 Bootstrap 設計好了畫面,接著要加上 Vue3 讓查詢動起來。
將以下的語法全部覆蓋至 \Views\AdmAnno\Index.cshtml 裡面。
|
1 2 3 4 5 6 7 8 9 10 11 12 13 14 15 16 17 18 19 20 21 22 23 24 25 26 27 28 29 30 31 32 33 34 35 36 37 38 39 40 41 42 43 44 45 46 47 48 49 50 51 52 53 54 55 56 57 58 59 60 61 62 63 64 65 66 67 68 69 70 71 72 73 74 75 76 77 78 79 80 81 82 83 84 85 86 87 88 89 90 91 92 93 94 95 96 97 98 99 100 |
<div id="app"> <div id="QueryPanel" class="card"> <div class="card-header"> 公告維護 </div> <div class="card-body"> <div class="row"> <div class="col-auto"> <label for="queryFormAnnoSubject" class="col-form-label">公告主題</label> </div> <div class="col-auto"> <input type="text" id="queryFormAnnoSubject" class="form-control" v-model="queryForm.AnnoSubject"> </div> <div class="col-auto"> <label for="queryFormAnnoStatus" class="col-form-label">公告狀態</label> </div> <div class="col-auto"> <select class="form-select" id="queryFormAnnoStatus" v-model="queryForm.AnnoStatus"> <option value="1">顯示</option> <option value="0">隱藏</option> </select> </div> </div> </div> <div class="card-header"> <button type="button" class="btn btn-primary" v-on:click="Query()">查詢</button> </div> <div class="card-body"> <table class="table"> <thead> <tr> <th>公告日期</th> <th>公告主題</th> <th>公告內容</th> <th>公告狀態</th> </tr> </thead> <tbody> <tr v-for="(item, index) in grid.datas"> <td>{{item.AnnoDate}}</td> <td>{{item.AnnoSubject}}</td> <td>{{item.AnnoContent}}</td> <td>{{item.AnnoStatusName}}</td> </tr> </tbody> </table> </div> </div> </div> @section scripts { <script> const app = Vue.createApp({ data() { return { queryForm:{ AnnoSubject: '' , AnnoStatus: '1' } , grid:{ datas:[] } } } , methods: { Query() { var self = this; // 組合表單資料 var postData = {}; postData['AnnoSubject'] = self.queryForm.AnnoSubject; postData['AnnoStatus'] = self.queryForm.AnnoStatus; $.blockUI(); // 使用 jQuery Ajax 傳送至後端 $.ajax({ url:'@Url.Content("~/AdmAnno/Query")', method:'POST', dataType:'json', data: { inModel: postData }, success: function (datas) { $.unblockUI(); if (datas.ErrMsg) { alert(datas.ErrMsg); return; } // 綁定列表 self.grid.datas = datas.Grid; }, error: function (err) { $.unblockUI(); alert(err.status + " " + err.statusText + '\n' + err.responseText); } }); } } }); const vm = app.mount('#app'); </script> } |
Controller 語法
在 View 查詢後會呼叫 ~/AdmAnno/Query,在 \Controllers\AdmAnnoController.cs 加入以下 Action。
|
1 2 3 4 5 6 7 8 9 10 11 12 13 14 15 16 17 18 19 20 21 22 23 24 25 26 27 28 29 30 31 32 33 34 35 36 37 38 39 40 41 42 43 44 45 46 |
/// <summary> /// 查詢公告 /// </summary> /// <param name="inModel"></param> /// <returns></returns> public IActionResult Query(QueryIn inModel) { QueryOut outModel = new QueryOut(); outModel.Grid = new List<AnnoModel>(); // 資料庫連線字串 string connStr = _configuration.GetConnectionString("SqlServer"); using (var cn = new SqlConnection(connStr)) { // 主要查詢 SQL string sql = @"SELECT Pkey, CONVERT(varchar(12) , AnnoDate, 111 ) as AnnoDate, AnnoSubject, AnnoContent, AnnoStatus, Case AnnoStatus when '1' then '顯示' when '0' then '隱藏' end As AnnoStatusName FROM Announcement WHERE 1=1 "; if (!string.IsNullOrEmpty(inModel.AnnoSubject)) { sql += " AND AnnoSubject LIKE @AnnoSubject "; } if (!string.IsNullOrEmpty(inModel.AnnoStatus)) { sql += " AND AnnoStatus = @AnnoStatus "; } sql += " ORDER BY AnnoDate desc, AnnoStatus "; object param = new { AnnoSubject = "%" + inModel.AnnoSubject + "%", AnnoStatus = inModel.AnnoStatus }; // 使用 Dapper 查詢 var list = cn.Query<AnnoModel>(sql, param); // 輸出物件 foreach (var item in list) { outModel.Grid.Add(item); } } return Json(outModel); } |
讀取 appsettings.json
我將資料庫連線放在 appsettings.json 裡面,打開 appsettings.json 後,加入以下連線字串。
|
1 2 3 |
"ConnectionStrings": { "SqlServer": "Data Source=127.0.0.1;Initial Catalog=Teach;Persist Security Info=false;User ID=test;Password=test;" } |
在 .NET 6 要取得 appsettings.json 的設定來源,要在 Controller 增加建構子讀取 Configuration。
|
1 2 3 4 5 6 |
private readonly IConfiguration _configuration; public AdmAnnoController(IConfiguration configuration) { _configuration = configuration; } |
安裝 Dapper
我資料庫互動物件使用微型 ORM 套件 Dapper,需要安裝 Dapper 才能使用。
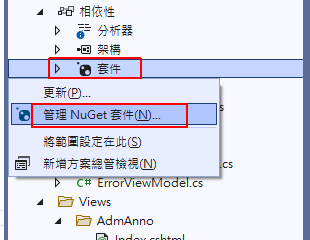
開啟「相依性 > 套件 > 管理 NuGet 套件」。
搜尋「Dapper」,安裝此套件。
建立 ViewModel
ViewModel 是用來定義 Controller 與 View 之間的欄位定義,我們剛剛建立了新 Controller,所以這次來建立它對應的 ViewModel。
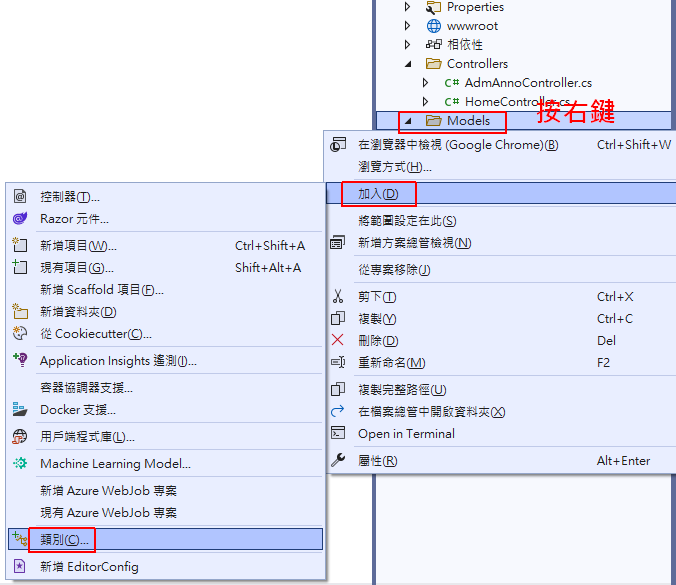
在「Model 按右鍵 > 加入 > 類別」。
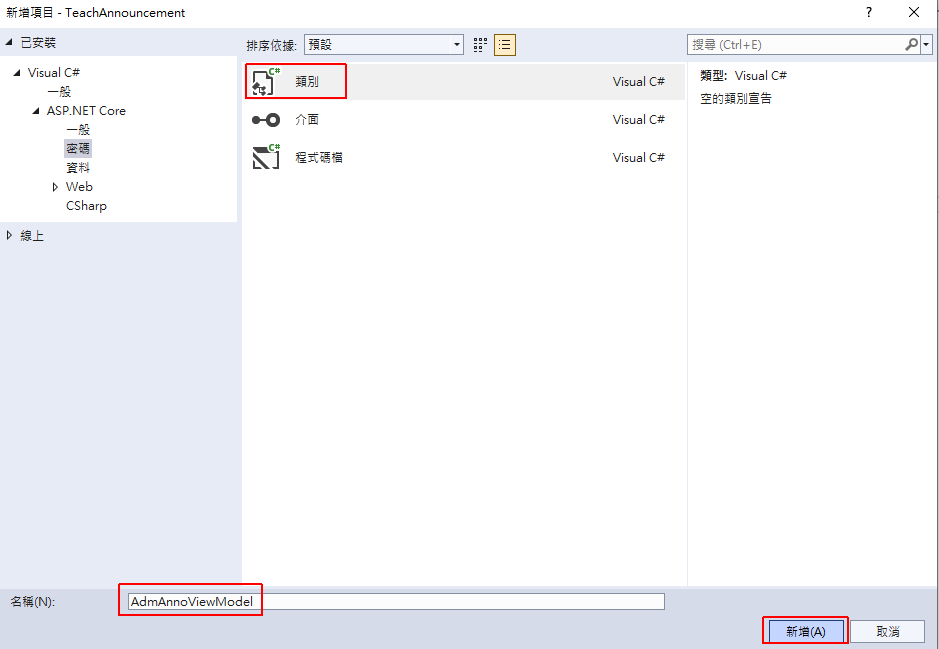
然後命名為 “AdmAnnoViewModel”。
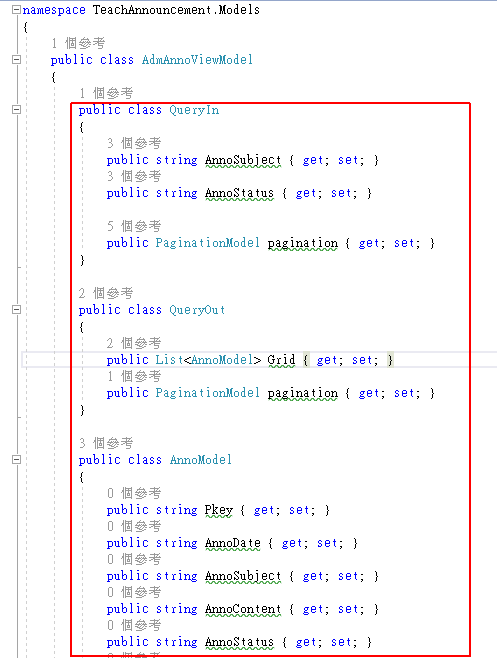
然後在 AdmAnnoViewModel 類別裡面,加入在 Controller 用到的 ViewModel。
|
1 2 3 4 5 6 7 8 9 10 11 12 13 14 15 16 17 18 19 20 |
public class QueryIn { public string AnnoSubject { get; set; } public string AnnoStatus { get; set; } } public class QueryOut { public List<AnnoModel> Grid { get; set; } } public class AnnoModel { public string Pkey { get; set; } public string AnnoDate { get; set; } public string AnnoSubject { get; set; } public string AnnoContent { get; set; } public string AnnoStatus { get; set; } public string AnnoStatusName { get; set; } } |
完成到這裡之後,我們就可以執行簡單的查詢功能了,按下 F5 後,執行「查詢」鈕,就可以顯示出資料庫內的資料了。
可是這時候我們還缺一個分頁的功能,接下來我們就繼續完成分頁的教學。
增加分頁查詢功能
網路上分頁的樣式很多種,而我提供我最常用的 Vue3 分頁元件給各位參考,我們前端是建立在 Vue3 上面的,所以我會在 Vue3 新增一個分頁的元件。
這段的教學會比較複雜一點,我是逐步語法教學,如果無法理解的話,可能下載看一下完整的範例來比對會比較容易懂一點。
新增 VuePagination.js 元件
分頁元件是一個多數頁面都會用到的功能,建議可以新增一個檔案,將分頁邏輯寫在裡面,然後在 Vue3 將元件引入。
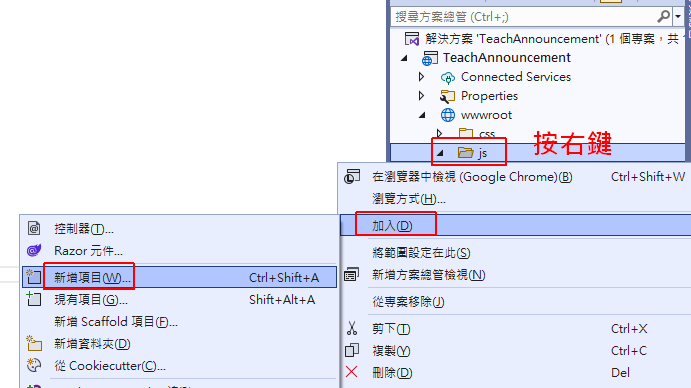
在 /js 目錄內新增一個檔案,檔案命名為 “VuePagination.js”。
然後在VuePagination.js 內貼上以下語法。
|
1 2 3 4 5 6 7 8 9 10 11 12 13 14 15 16 17 18 19 20 21 22 23 24 25 26 27 28 29 30 31 32 33 34 35 36 37 38 39 40 41 42 43 44 45 46 47 48 49 50 51 52 53 54 55 56 57 58 59 60 61 62 63 64 65 66 67 68 69 70 71 72 73 74 75 76 |
const VuePagination = { data() { return { PerPage:'每頁' , PageTiems:'筆' , Page:'第' , Times:'頁' , Total:'共' , TotalPage:'頁' } } , props: ['pagination'] , template: ` <div style="text-align:right"> <span v-for="pageNo in pagination.pages"> <a v-if="pagination.pageNo != pageNo" v-on:click="gotoPage(pageNo)" style="cursor:pointer"> {{ pageNo }} </a> <label v-else> {{ "[" + pageNo + "]" }} </label> </span> <span class="pager-nav"> 【{{PerPage}} <input type="text" maxlength="3" style="width:35px;text-align:center;font-size:12px;" name="pageSize" :value="pagination.pageSize" v-on:change="onchange"/> {{PageTiems}}, {{Total}} {{pagination.totalPage}} {{TotalPage}} {{pagination.totalCount}} {{PageTiems}}】 <button type="button" class="btn btn-secondary btn-sm pager-btn" style="margin-bottom: 5px;margin-right:5px;" v-on:click="gotoPage()">Q</button> </span> </div>` , methods: { gotoPage(pageNo) { var self = this; console.log(pageNo); // 是否有傳入指定頁數 if (pageNo !== undefined) { if (pageNo === '<') { self.pagination.pageNo = parseInt(self.pagination.pageNo) - 1; } else if (pageNo === '>') { self.pagination.pageNo = parseInt(self.pagination.pageNo) + 1; } else if (pageNo === '<<') { self.pagination.pageNo = (Math.floor((parseInt(self.pagination.pageNo) - 10) / 10) * 10 + 1); } else if (pageNo === '>>') { self.pagination.pageNo = (Math.floor((parseInt(self.pagination.pageNo) + 10) / 10) * 10 + 1); } else { self.pagination.pageNo = parseInt(pageNo); } } else { self.pagination.pageNo = 1; } // 指定頁數為0,自動變更為1 if (parseInt(self.pagination.pageNo) === 0 || self.IsNumeric(self.pagination.pageNo) === false) { self.pagination.pageNo = 1; } // 指定頁數大於總頁數,自動變更為總頁數 self.pagination.pageNo = parseInt(self.pagination.pageNo) > parseInt(self.pagination.totalPage) ? self.pagination.totalPage : self.pagination.pageNo; // 指定筆數為0,自動變更為10 if (parseInt(self.pagination.pageSize) === 0 || self.IsNumeric(self.pagination.pageSize) === false) { self.pagination.pageSize = 10; } // call on even this.$emit('requery', { pagination: self.pagination }); } , onchange(e) { var self = this; var re = /[^0-9]/; if (re.test(e.target.value) === false) { self.pagination[e.target.name] = parseInt(e.target.value); } } , IsNumeric(n) { return (n - 0) === n && n.toString().length > 0; } } }; |
引用 VuePagination.js 元件
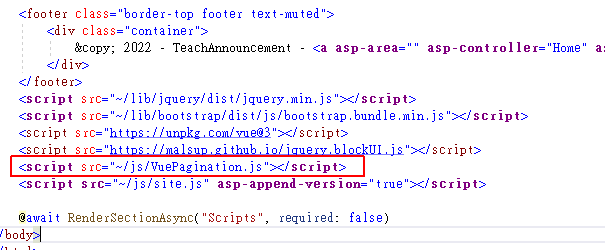
在 \Views\Shared\_Layout.cshtml 的 JavaScript 增加引用 VuePagination.js 檔案。
<script src="~/js/VuePagination.js"></script>
註冊 VuePagination.js 元件
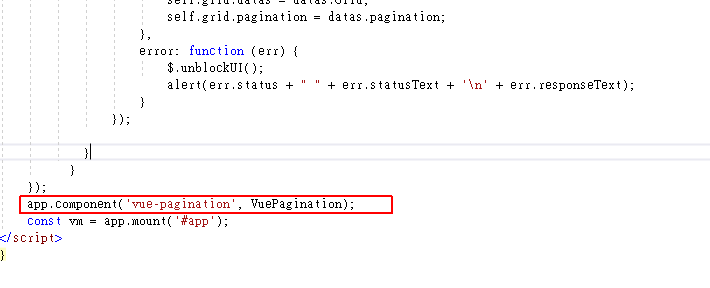
Vue3 元件需要註冊在 Vue.createApp({}); 內才行,為 Vue 實體註冊元件,名稱為 “vue-pagination”。
app.component('vue-pagination', VuePagination);
使用分頁元件
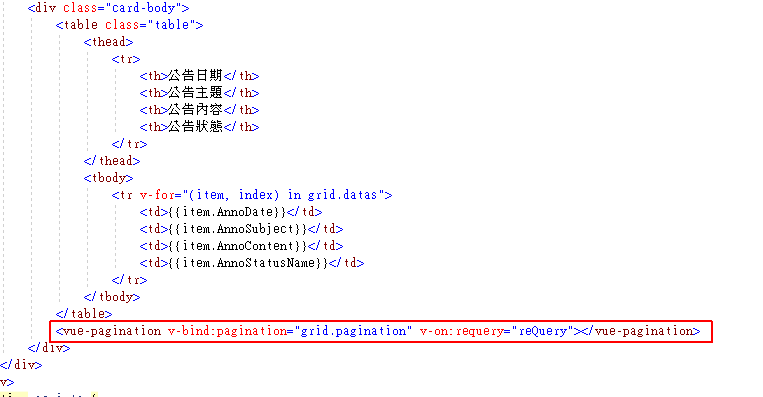
註冊好之後,就可以在畫面上分頁的位置,放上它的元件。
<vue-pagination v-bind:pagination="grid.pagination" v-on:requery="reQuery"></vue-pagination>
因為分頁會重新查詢,所以這元件會呼叫查詢頁的 reQuery() 功能,執行重新查詢。
View 查詢功能調整
我們剛剛已經寫好了基本的查詢 Query(),這裡因為分頁功能再調整一下,並增加一個 reQuery() 讓換頁時可以重新呼叫。
調整後的方法是:
|
1 2 3 4 5 6 7 8 9 10 11 12 13 14 15 16 17 18 19 20 21 22 23 24 25 26 27 28 29 30 31 32 33 34 35 36 37 38 39 40 41 42 43 44 45 46 47 |
Query(reQuery) { var self = this; if (reQuery !== 'reQuery') { self.grid.pagination.pageNo = 1; } // 組合表單資料 var postData = {}; postData['AnnoSubject'] = self.queryForm.AnnoSubject; postData['AnnoStatus'] = self.queryForm.AnnoStatus; // 附加分頁 postData['pagination'] = JSON.parse(JSON.stringify(self.grid.pagination)); $.blockUI(); // 使用 jQuery Ajax 傳送至後端 $.ajax({ url:'@Url.Content("~/AdmAnno/Query")', method:'POST', dataType:'json', data: { inModel: postData }, success: function (datas) { $.unblockUI(); if (datas.ErrMsg) { alert(datas.ErrMsg); return; } // 綁定列表 self.grid.datas = datas.Grid; self.grid.pagination = datas.pagination; }, error: function (err) { $.unblockUI(); alert(err.status + " " + err.statusText + '\n' + err.responseText); } }); } // 執行重查 , reQuery(emitData) { var self = this; if (emitData !== undefined) { self.grid.pagination = emitData.pagination; } self.Query('reQuery'); } |
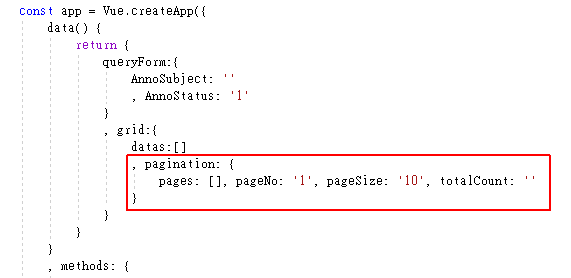
grid 物件增加分頁屬性
在 Vue3 原有宣告的 data 屬性 grid 要增加一個分頁屬性:
|
1 2 3 |
, pagination: { pages: [], pageNo: '1', pageSize: '10', totalCount: '' } |
Controller 查詢功能調整
在 Controller 原本也寫好了基本查詢功能,這裡因增加分頁查詢後,也要調整一下語法,可用以下語法直接取代原本的語法:
|
1 2 3 4 5 6 7 8 9 10 11 12 13 14 15 16 17 18 19 20 21 22 23 24 25 26 27 28 29 30 31 32 33 34 35 36 37 38 39 40 41 42 43 44 45 46 47 48 49 50 51 52 53 54 55 56 57 58 59 60 61 62 63 64 65 66 67 68 69 70 71 72 73 74 75 76 77 78 79 80 81 82 83 84 85 86 87 88 89 90 91 92 93 94 95 96 97 98 99 100 101 102 103 104 105 106 107 108 109 110 111 112 113 114 115 116 117 118 119 120 121 122 123 124 125 126 127 128 129 130 131 132 133 134 |
/// <summary> /// 查詢公告 /// </summary> /// <param name="inModel"></param> /// <returns></returns> public IActionResult Query(QueryIn inModel) { QueryOut outModel = new QueryOut(); outModel.Grid = new List<AnnoModel>(); // 資料庫連線字串 string connStr = _configuration.GetConnectionString("SqlServer"); using (var cn = new SqlConnection(connStr)) { // 主要查詢 SQL string sql = @"SELECT Pkey, CONVERT(varchar(12) , AnnoDate, 111 ) as AnnoDate, AnnoSubject, AnnoContent, AnnoStatus, Case AnnoStatus when '1' then '顯示' when '0' then '隱藏' end As AnnoStatusName FROM Announcement WHERE 1=1 "; if (!string.IsNullOrEmpty(inModel.AnnoSubject)) { sql += " AND AnnoSubject LIKE @AnnoSubject "; } if (!string.IsNullOrEmpty(inModel.AnnoStatus)) { sql += " AND AnnoStatus = @AnnoStatus "; } sql += " ORDER BY AnnoDate desc, AnnoStatus "; object param = new { AnnoSubject = "%" + inModel.AnnoSubject + "%", AnnoStatus = inModel.AnnoStatus }; // 分頁處理 int totalRowCount = 0; if (inModel.pagination.pageNo > 0) { string orderBy = ""; // 取得總筆數 string totalRowSql = sql; if (totalRowSql.ToUpper().IndexOf("ORDER BY") > -1) { orderBy = totalRowSql.Substring(sql.ToUpper().LastIndexOf("ORDER BY")); totalRowSql = totalRowSql.Replace(orderBy, ""); } totalRowSql = "SELECT COUNT(*) AS CNT FROM (" + totalRowSql + ") CNT_TABLE"; var rowCnt = cn.Query(totalRowSql, param); foreach (var item in rowCnt) { totalRowCount = item.CNT; } // 取得分頁 SQL int startRow = ((inModel.pagination.pageNo - 1) * inModel.pagination.pageSize) + 1; int endRow = (startRow + inModel.pagination.pageSize) - 1; orderBy = sql.Substring(sql.ToString().ToUpper().LastIndexOf("ORDER BY")); sql = sql.Replace(orderBy, ""); // 去除 Order by 別名 orderBy = orderBy.ToUpper().Replace("ORDER BY", ""); StringBuilder newOrderBy = new StringBuilder(); int index = 0; string[] orderBys = orderBy.Split(','); for (int i = 0; i < orderBys.Length; i++) { if (newOrderBy.Length > 0) { newOrderBy.Append(","); } string ob = orderBys[i]; index = ob.IndexOf('.'); if (index > -1) { newOrderBy.Append(ob.Substring(index + 1)); } else { newOrderBy.Append(ob); } } newOrderBy.Insert(0, "ORDER BY "); sql = string.Concat( new object[] { "SELECT * FROM (SELECT *, ROW_NUMBER() OVER (", newOrderBy.ToString(), ") AS RCOUNT FROM (", sql, ") PAGE_SQL ) PAGE_SQL2 WHERE PAGE_SQL2.RCOUNT BETWEEN " , startRow, " AND ", endRow, " ", newOrderBy.ToString() }); } // 使用 Dapper 查詢 var list = cn.Query<AnnoModel>(sql, param); // 輸出物件 foreach (var item in list) { outModel.Grid.Add(item); } // 計算分頁 outModel.pagination = this.PreparePage(inModel.pagination, totalRowCount); } return Json(outModel); } /// <summary> /// 計算分頁 /// </summary> /// <param name="model"></param> /// <param name="TotalRowCount"></param> /// <returns></returns> public PaginationModel PreparePage(PaginationModel model, int TotalRowCount) { List<string> pages = new List<string>(); int pageStart = ((model.pageNo - 1) / 10) * 10; model.totalCount = TotalRowCount; model.totalPage = Convert.ToInt16(Math.Ceiling( double.Parse(model.totalCount.ToString()) / double.Parse(model.pageSize.ToString()) )); if (model.pageNo > 10) pages.Add("<<"); if (model.pageNo > 1) pages.Add("<"); for (int i = 1; i <= 10; ++i) { if (pageStart + i > model.totalPage) break; pages.Add((pageStart + i).ToString()); } if (model.pageNo < model.totalPage) pages.Add(">"); if ((pageStart + 10) < model.totalPage) pages.Add(">>"); model.pages = pages; return model; } |
在 SQL Server 的分頁,我是直接修改 SQL 語法,先查詢總筆數,再查詢需要的範圍資料,當每次換頁時,都會重新計算,只查詢需要的資料範圍。
ViewModel 調整
ViewModel 的部份就是增加分頁的物件,這裡我就全部貼上語法,可以直接取代之前的 Model。
|
1 2 3 4 5 6 7 8 9 10 11 12 13 14 15 16 17 18 19 20 21 22 23 24 25 26 27 28 29 30 31 32 33 34 35 |
public class QueryIn { public string AnnoSubject { get; set; } public string AnnoStatus { get; set; } public PaginationModel pagination { get; set; } } public class QueryOut { public List<AnnoModel> Grid { get; set; } public PaginationModel pagination { get; set; } } public class AnnoModel { public string Pkey { get; set; } public string AnnoDate { get; set; } public string AnnoSubject { get; set; } public string AnnoContent { get; set; } public string AnnoStatus { get; set; } public string AnnoStatusName { get; set; } } /// <summary> // 分頁 Model /// </summary> public class PaginationModel { public List<string> pages { get; set; } public int pageNo { get; set; } public int pageSize { get; set; } public int totalPage { get; set; } public int totalCount { get; set; } } |
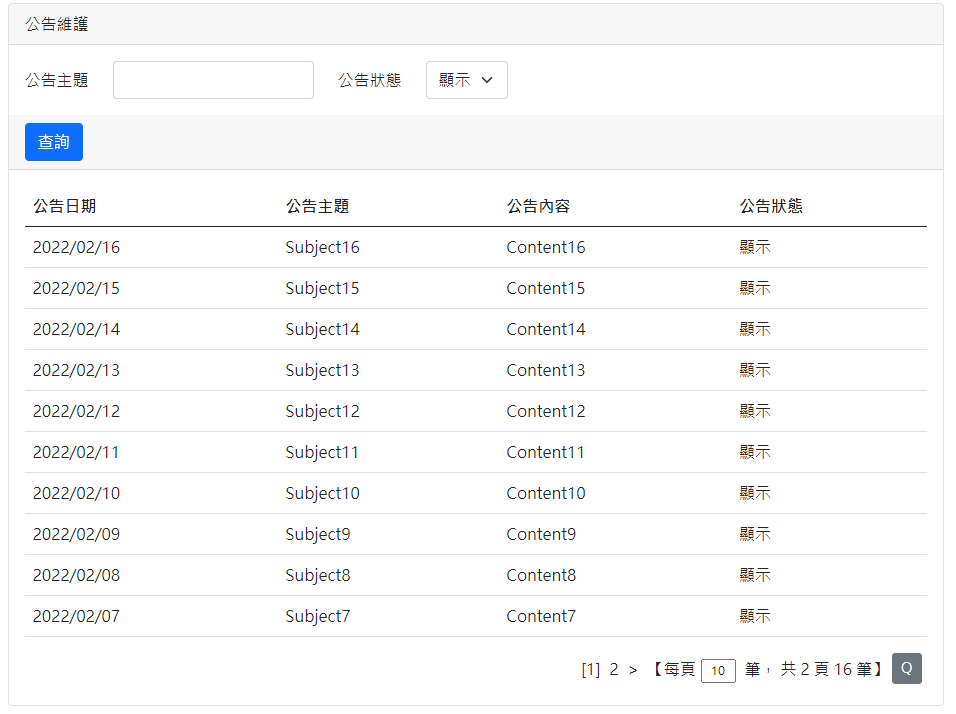
當完成這裡後,就可以測試分頁的功能了,按 F5 執行專案,查詢資料後就會顯示分頁的結果。
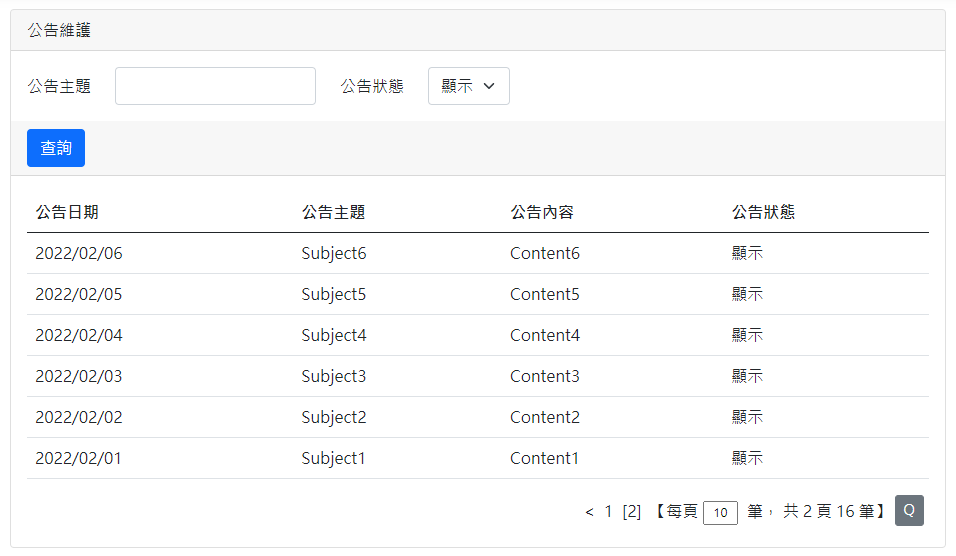
切換第 2 頁。
這是我很常用的前端分頁元件,分享給你。
範例下載
下一篇教學文章
推薦課程
相關學習文章
如果你在學習上有不懂的地方,需要諮詢服務,可以參考站長服務,我想辨法解決你的問題
如果文章內容有過時、不適用或錯誤的地方,幫我在下方留言通知我一下,謝謝
![[ASP.NET Core MVC][Vue3][Dapper] 前後台網站公告範例 - 後台查詢頁面教學](https://blog.hungwin.com.tw/wp-content/uploads/2022/02/aspnet-mvc-anno-backstage-query.png)





有跟著做完了,感謝大大
跟著飛的時候在6-3迷失了
最後找到是5-1的第97行
接下來有一些在那一頁裡面找到線索才得以完成
可能是因為我還不熟
學習總是在解決問題之後,加油~